Thursday, March 31, 2016

Session Factory Session and Hibernate.cfg.xml

          
            Let move on next, how to configure hibernate in java code and what is hibernate.cfg.xml and its properties. For the basic Hibernate architecture please look my previous post.


Look the below code, 

public void hibernateConfiguration() {
SessionFactory sessionFactory = null;
Session session = null;
try {
       Configuration configuration = new Configuration();
       configuration.configure("hibernate.cfg.xml");
       ServiceRegistry serviceRegistry = new StandardServiceRegistryBuilder().
              applySettings(configuration.getProperties()).build();
       sessionFactory = configuration.buildSessionFactory(serviceRegistry);
       session = sessionFactory.openSession();
       persistEmployee(session);
     } catch (Exception e) {
         LOGGER.log(Level.SEVERE, e.getMessage(), e); //Simply your logger message
     } finally {
          if (session != null) {
              session.close();
     }
     if (sessionFactory != null) {
        sessionFactory.close();
    }
  }

               From the above code, hibernateConfiguration() creates a new instance for Configuration class. For configuring hibernate.cfg.xml, you must put configuration xml file at root of your project classpath. Else, you may encountered a problem hibernate.cfg.xml not found. Runtime only this file will be find.


       Pass your hibernate.cfg.xml as a string arguments for the configure method like configuration.configure("hibernate.cfg.xml"); There is lot of others way also to configure this xml means, getting from URL, File location etc., For referring those all methods, please check this link .

            Next, create serviceregistry instance and pass it as an argument to buildSessionFactory() method of configuration. ServiceRegistry is redesigned for some performance purpose and it was introduced in Hibernate 4. For more please visit this ServiceRegistry.

Now SessionFactory can obtain session for to do the activities with Entities.

Difference between SessionFactory and session?

     Simply we can say, sessionFactory is an instance, which will be used to create an instance for sessions.

SessionFactory is thread safe whereas session is not thread safe.

hibernate.cfg.xml explanation


org.h2.Driver
jdbc:h2:~/hibernateTest;AUTOCOMMIT=OFF


1
org.hibernate.dialect.H2Dialect
thread
org.hibernate.cache.internal.NoCacheProvider</property>
true
true
create


Now let’s check all the properties of sessionFactory in above xml.

connection.driver_class:

            Specifies the database driver that should be used for your application. Here I have taken H2 database (In Memory Database).

connection.url :

            It specifies the JDBC URL , here the case is , h2 and database name is :~/hibernateTest and I want to commit data by my own code. So I have chooses AUTOCOMMIT=OFF.

connection.username:  

            Specifies the database user name.

connection.password:

            Specifies the database password.

connection.pool_size:

            Specifies the connection pool size for your application. Here my case, my application will use single thread as execution, So I put 1 as pool size. Suppose, if your application made a dealing with multiple threads and multiple users, then appropriate size should choose. 

dialect:

            Specifies a java class that will translate specific SQL dialect, here the case is H2.

current_session_context_class:

            Specifies the hibernate session configured, default value is JTA(Java Transaction API). Here I ordered hibernate to make a configuration with thread to do the operation with current thread.

cache.provider_class:

            Specifies to utilize an entity cache. I don’t like to use cache here, so chosen NoCacheProvider Cache provider is a big concept, will publish this as a separate post.

show_sql:

            To display the sql in console output.

format_sql:

            Sql query will be formatted for user readability.

hbm2ddl.auto:

            Specifies whether hibernate want to create schema while during start up. I used property value as create for creating tables during start up.

mapping resource:

            mapping a resource, which contains mapping information for your application.
Wednesday, March 30, 2016

Hibernate Architecture Basic Introduction

Hibernate Architecture Basic Introduction

               Hibernate is one of the most popular Object/Relational Mapping (ORM) framework. It will provide developers to map normal java objects to relational structure of database.
Important components in Hibernate:

Entities: Entity is nothing but, it’s a simple java class(POJO) which is mapped to relational database by Hibernate.

Object Relational Meta data: There are two ways developers can choose how to map the entities to relational data base.   
    1. Legacy XML based configuration 
    2. Annotation ( Since jdk 1.5)
3   Hibernate Query Language (HQL):  HQL is similar to SQL but it’s an Object oriented query language and it will do all actions on persistent objects and its properties.


What persistent means in hibernate?
         
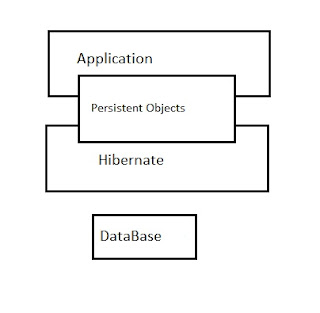
                 Persistent is the instances of your POJO classes and It will create Rows and Tables in the database. In future any modification happened on that POJO instance, and then it will be synchronized to database with the help of session scope.

Persistent Objects
Persistent Object

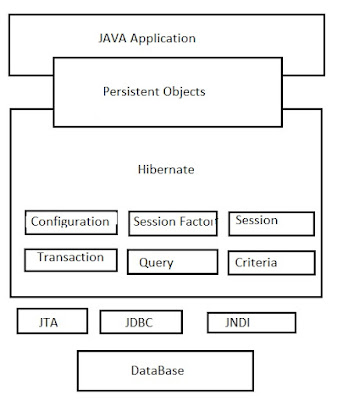
Hibernate Architecture
Hibernate Structure
Hibernate Architecture

Configuration:

             In any Hibernate application configuration object will be created at first during application initialization and it will be created only once. It’s available inside org.hibernate.cfg.Configuration.
Developer should pass hibernate.cfg.xml to configuration object and sub sequentially it will be configured.

SessionFactory:  

            Session Factory objects are implemented by using singleton pattern and It’s completely thread-Safe. Since Session Factory is Heavy Weight object, mostly developers will create this only once per application.

Why Session Factory is Heavy Weight Object?

           Since its having the details of DB connection information, Hibernate configuration information, mapping configuration files etc., so if you try to create number of session factory instance, it will make your application as Heavy Weight.

Session:

           Session is not a thread safe and light weight. All operations of persistent object will be done by Session object.

Transaction:  
           It allows the application to define some units of work. We can configure transaction management by our own way. So that, we have to write code for manually for commit and rollback. The below chart will explain simply.


Query:

            HQL is similar to SQL but it’s an Object oriented query language and it will do all actions on persistent objects and its properties. By calling createQuery() method of session object, you can obtain query like below.

Query query=session.createQuery ("from Employee");
Employee is your persistent class.

We can see deeply later on delete update etc.,

Criteria:

           Criteria is a powerful API, It allows developer to apply restriction rules and logical conditions. With the help of session object developer can apply criteria on persistent class through below.

Criteria criteria = session.createCriteria(Employee.class);

Saturday, March 26, 2016

How HashMap works internally in java?

HashMap is working based on the concept of Hashing. Before moving into further, we should know the following concepts.
  • Hashing
  • Bucket
  • Collision
  • Entry
        Hashing - Assigning an unique code for all types of variable or object with the help of algorithm/function/formula.

       Bucket – Used to store Key Value pairs. It can have multiple key value pairs and this bucket will use LinkedList as an instance. Based on hash map length buckets will be created.

       Collision – If two key objects have same hashcode, then it is called collision.

       Entry – HashMap class have one inner class called Entry for storing your Key value pairs.


Structure of Entry class:

static class Entry implements Map.Entry
{
        final K key; //instance variable
        V value; // instance variable
        Entry next;
        final int hash;
        ...//More code goes here
}

Now let’s see how put(K key, V value) working

/**
     * Associates the specified value with the specified key in this map.
     * If the map previously contained a mapping for the key, the old
     * value is replaced.
     *
     * @param key key with which the specified value is to be associated
     * @param value value to be associated with the specified key
     * @return the previous value associated with key, or
     *         null if there was no mapping for key.
     *         (A null return can also indicate that the map
     *         previously associated null with key.)
     */
    public V put(K key, V value) {
        if (key == null)
            return putForNullKey(value);
        int hash = hash(key.hashCode());
        int i = indexFor(hash, table.length);
        for (Entry e = table[i]; e != null; e = e.next) {
            Object k;
            if (e.hash == hash && ((k = e.key) == key || key.equals(k))) {
                V oldValue = e.value;
                e.value = value;
                e.recordAccess(this);
                return oldValue;
            }
        }

        modCount++;
        addEntry(hash, key, value, i);
        return null;
    }

  1.  First It will check whether given key is null or not. If specified Key is null then it will be stored at table [0]. Table [0] is nothing but, it is Bucket 0. It’s a rule; null should be always stored in index [0].
  2. Important point to remember, HashMap can allow only one null key.
  3.  Next if it is not null, hascode will be calculated for the key objects. This hascode will be useful to find the index of an array of your storing Entry object.(Key value)
  4.  Next indexFor (hash, table.length) will be executed and correct index integer value will be returned for storing Entry object.
  5.  There is a possibility two key object have same hashcode means Collison, and then it will be stored in the form of LinkedList.
  6. Suppose if no object is present in index, then it will directly put Entry object there.
  7. Suppose if any existing elements there, it will use next operation to find the place to put your Entry object. After finding it will put.
  8.  Next key.equals (k) will be executed to avoid adding duplicate keys. This method will check whether key object is equal or not. If it is equal (TRUE) it will replace your old Entry object with new Entry object (Current Entry object).

Now let’s see how (K key) get working


/**
     * Returns the value to which the specified key is mapped,
     * or {@code null} if this map contains no mapping for the key.
     *
     * More formally, if this map contains a mapping from a key
     * {@code k} to a value {@code v} such that {@code (key==null ? k==null :
     * key.equals(k))}, then this method returns {@code v}; otherwise
     * it returns {@code null}.  (There can be at most one such mapping.)
     *
     * 
A return value of {@code null} does not necessarily
     * indicate that the map contains no mapping for the key; it's also
     * possible that the map explicitly maps the key to {@code null}.
     * The {@link #containsKey containsKey} operation may be used to
     * distinguish these two cases.
     *
     * @see #put(Object, Object)
     */
    public V get(Object key) {
        if (key == null)
            return getForNullKey();
        int hash = hash(key.hashCode());
        for (Entry e = table[indexFor(hash, table.length)];
             e != null;
             e = e.next) {
            Object k;
            if (e.hash == hash && ((k = e.key) == key || key.equals(k)))
                return e.value;
        }
        return null;
    }

  1. First It will check whether given key is null or not. If specified Key is null then it will return value object of that key object. As it is null, value will be returned from Table[0](Bucket 0).
  2. If it is not null, hashcode will be calculated for the key object.
  3. Next it will identify where the exact index in table for the generated hashcode to get the Entry object with the help of indexFor (hash, table.length).
  4.  Once table [] index was found, it iterate the LinkedList and will check for key equality by using key.equals (k). If it will return TRUE, then value object of that Key will be returned. Otherwise, null will be returned.
Happy learning.

Thursday, March 24, 2016

Comparator and Comparable Interface in java

Comparable Interface:

        It’s an interface under the package of java.lang.comparable, which having one method int compareTo(T o). We can use this method ordering(sort logic only) the object. It will compare this object with your specified object for ordering purpose. 

Key points to remember in comparable interface:
  • You must write the sort logic in the same class whose objects to be sorted. So people will call this in the name of Natural Ordering.
  •  The class must implements Comparable interface. So that, compareTo overriding is possible. Good thing here is, Generics possible.
  •  Collections.sort(List) should be called for sorting.
            Return type of compareTo method is int. So three possible returning values.

int compareTo(Object obj)

          1.  Positive – this object is greater than obj.
          2.   Zero – this object is equals to obj.
          3.  negative – this object is less than obj.

Below I have written code for explaining comparable interface with simple Fruits class.

package com.test.javahit;

public class Fruits implements Comparable{
 
 private int fruitId;
 private String fruitName;
 
 public Fruits(int id,String name){
  this.fruitId = id;
  this.fruitName = name;
 }
 
 public int getFruitId() {
  return fruitId;
 }
 public void setFruitId(int fruitId) {
  this.fruitId = fruitId;
 }
 public String getFruitName() {
  return fruitName;
 }
 public void setFruitName(String fruitName) {
  this.fruitName = fruitName;
 }

 // Comparing logic by fruits Id
 @Override
 public int compareTo(Object obj) {
  
  Fruits fruits = (Fruits) obj;
  
  //Compare logic with Ternary operator
  return (this.fruitId < fruits.fruitId) ? -1 : (this.fruitId > fruits.fruitId) ? 1 : 0;
  
  
  //Use below If above logic is confuse
  
  /*if (this.fruitId > fruits.getFruitId())
   return 1;
  else if (this.fruitId < fruits.getFruitId())
   return -1;
  else
   return 0;*/
 }
}

Next below is our main method class MainTest.

package com.test.javahit;

import java.util.ArrayList;
import java.util.Collections;
import java.util.Comparator;
import java.util.List;

public class MainTest {

 /**
  * @param args
  */
 public static void main(String[] args) {
  
  //Add fruit id and name for all fruits
  Fruits fruit1 = new Fruits(3, "Banana");
  Fruits fruit2= new Fruits(1, "Orange");
  Fruits fruit3 = new Fruits(2, "Apple");
  Fruits fruit4 = new Fruits(4, "Cherry");
  
  //Create a list for fruits
  List listOfFruits = new ArrayList();
  listOfFruits.add(fruit1);
  listOfFruits.add(fruit2);
  listOfFruits.add(fruit3);
  listOfFruits.add(fruit4);
  
  
  System.out.println("Before using compareTo method in Fruits class");
  for (int i=0; i< listOfFruits.size(); i++) {
   
   Fruits fruitName = (Fruits)listOfFruits.get(i);
   System.out.println("Fruit Id :" + fruitName.getFruitId() + "  Fruit Name :" + fruitName.getFruitName());
  }
  
  Collections.sort(listOfFruits);
  System.out.println("After using Collections.sort() for Fruit Id");
  
  for (int i=0; i< listOfFruits.size();i++) {
   Fruits fruitSortedList = (Fruits) listOfFruits.get(i);
   System.out.println("Fruit Id :" + fruitSortedList.getFruitId() + "  Fruit Name :" + fruitSortedList.getFruitName());
  }
 }

}

The Fruits class is implementing Comparable interface for overriding compareTo  method. This method have the logic id. Please see Fruits class comapreTo method . I used ternary operator(conditional) for comparing objects. We can use simple if else condition also to compare the objects.

Once you execute MainTest class, you will find below output: 

Before using compareTo method in Fruits class
Fruit Id :3  Fruit Name :Banana
Fruit Id :1  Fruit Name :Orange
Fruit Id :2  Fruit Name :Apple
Fruit Id :4  Fruit Name :Cherry
After using Collections.sort() for Fruit Id
Fruit Id :1  Fruit Name :Orange
Fruit Id :2  Fruit Name :Apple
Fruit Id :3  Fruit Name :Banana
Fruit Id :4  Fruit Name :Cherry


Comparator Interface:

            It’s an interface under the package of java.util.comparator, which having one method int compare(Object o1 , Object o2).

Key points to remember in comparable interface :

  • Sorting logic should be placed in separate class, so that we can write sort based on different attributes of objects. It means, you can sort fruitId, fruitName etc.,
  • Some other class needs to implement comparator Interface for sorting logic, here the case is FruitsIdSortingComparator.
  • Collections.sort(List, Comparator) should be called for sorting.
  • Return type of compare method is int. So three possible returning values.int compare(Object o1,Object o2). It will compare thwo object o1 and o2 and will return an integer.

1. positive – o1 is greater than o2
2. zero – o1 equals to o2
3. negative – o1 is less than o1


Below is the code for FruitsIdSortingComparator class, its implementing comparator interface. 


import java.util.Comparator;
public class FruitsIdSortingComparator implements Comparator{

@Override
public int compare(Fruits fruits1, Fruits fruits2) {
  Fruits fruits = (Fruits) obj;
  //Compare logic with Ternary operator
  return (fruits1.getFruitId() < fruits2.getFruitId()) ? -1 : (fruits1.getFruitId() > fruits2.getFruitId()) ? 1 : 0;
}


Below I have added below code,  comparator interface logic for sorting with MainTest class.


//By using comparator interface
  //For Fruit ID
  Collections.sort(listOfFruits,new FruitsIdSortingComparator());
  
  //For Fruit Name
  Collections.sort(listOfFruits, new Comparator() {

   @Override
   public int compare(Fruits o1, Fruits o2) {
    return o1.getFruitName().compareTo(o2.getFruitName());
   }
   
  }); 
  
  System.out.println("\nAfter sort by Fruit Name : \n");
  for (int i=0;i<listOfFruits.size();i++) {
   Fruits fruitname = (Fruits) listOfFruits.get(i);
   System.out.println(" Fruit Name : " + fruitname.getFruitName());
  }

Now just run MainTest class, you able to find the below output.


After sort by Fruit Name :

Fruit Name : Apple
Fruit Name : Banana
Fruit Name : Cherry
Fruit Name : Orange


Tuesday, March 22, 2016

Spring + Maven + Log4j for HelloWorld

Log4j is very useful for developer to identify code flow logging information.

In this project I have used below tools and technologies.

1. Eclipse Indigo
2. Spring
3. Maven
4. Log4j

In previous section I have simply developed helloworld program with Spring and Maven. Here I am going to add just log4j configuration and its usage.

Since our application created through maven, we should add log4j dependency in pom.xml. I have mentioned group id , artifact id, scope and version for log4j. Here runtime scope indicates dependency is required at execution time only, not on compilation time.


  4.0.0
  com.test
  helloworld
  0.0.1-SNAPSHOT


   org.springframework
   spring-core
   ${spring.version}
  
  
   org.springframework
   spring-context
   ${spring.version}
  
  
   log4j
   log4j
   runtime
   ${log4j.version}


  3.2.3.RELEASE
  1.2.17


Create a log4j.properties file under src/main/resources. The below is log4j property file.

# LOG4J configuration

#You can set here different level like ALL,INFO,WARN etc.,
log4j.rootLogger=INFO, TestConsoleAppender, TestFileAppeneder
 
log4j.appender.TestConsoleAppender=org.apache.log4j.ConsoleAppender
log4j.appender.TestConsoleAppender.layout=org.apache.log4j.PatternLayout
log4j.appender.TestConsoleAppender.layout.ConversionPattern=%-7p %d [%t] %c %x - %m%n
 
log4j.appender.TestFileAppeneder=org.apache.log4j.FileAppender
log4j.appender.TestFileAppeneder.File=C:/logs/test.log
log4j.appender.TestFileAppeneder.layout=org.apache.log4j.PatternLayout
log4j.appender.TestFileAppeneder.layout.ConversionPattern=%-7p %d [%t] %c %x - %m%n

In above property file, I have configured root logger in INFO level with ConsoleAppender and FileAppender.

1. Added TestConsoleAppender for the purpose of console output to display in console tab.

2. Added TestFileAppeneder for the purpose of create a log file in your local drive. Suppose if you have web application, there is good way to add your log file with your web server. Just you need to change the path location to web server directory.

Finally, in our java code I added sayHello method that have all logging level possibilities.(TRACE,DEBUG,INFO,WARN,ERROR,FATAL).

Based on your log4j configuration only, log will be printed. For example, if you set rootlogger as ALL all log levels will be printed. But in our code I have set to INFO, so INFO,WARN, ERROR and FATAL will be displayed based on its hierarchy level. TRACE and DEBUG will not be printed.

Log4j Hierarchy Order

  • OFF
  • FATAL
  • ERROR
  • WARN
  • INFO
  • DEBUG
  • TRACE
  • ALL


For more info please visit Log4J levels details

Java code is below. 

package com.test.helloworld;

import org.apache.log4j.Logger;
 
//@Service("helloWorld")
public class HelloService {
 
 private static final Logger LOGGER = Logger.getLogger(HelloService.class);
 private String name;
 
 public void setName(String name) {
  this.name = name;
 }
 
 public String sayHello() {
  
  LOGGER.trace("Trace Message!");
  LOGGER.debug("Debug Message!");
  LOGGER.info("Info Message!");
  LOGGER.warn("Warn Message!");
  LOGGER.error("Error Message!");
  LOGGER.fatal("Fatal Message!");
  return "Hello ! Spring + Maven + Log4J Tested by " + name;
 }
}

Now we have to run HelloTest java code, the below out put you able to see in console tab, due to adding ConsoleAppender.

Note:  In my previous post, you can find HelloTest and application context xml code.

Spring_maven_log4j


At the same time, log file also generated at C:\logs location, since you provided in FileAppender configuration in log4j property file.

log4j

Thats All. Happy Learning!!!

Monday, March 21, 2016

Simple program with Spring + Maven

The below simple program developed with Spring and maven configuration.

Technologies used:

1.Eclipse Indigo
2.Jdk 1.6
3.Maven 3.0.4
4.Spring 3.2.3

Note: If any image is not able to see properly, please click on that image. It will show nice visible mode.

Step 1: Open eclipse, File àNew à Maven à Maven Project. Its look like below.

Maven
Step 2: Once you create maven project , select (tick) create a simple project. you will see the below in next screen. 

Simple Project
Step 3: Click Next. You will see below in next screen. Please provide Group Id and Artifact Id which is related to maven. Its look like below.

Here I provided,
Group Id : com.test
Artifact Id: helloworld

Group Id: It will identify your project uniquely across all your projects. It has to follow package name rules (Naming schema). 

Artifact Id: Project name as artifact id for the purpose of JAR. Always put frinedly name here.

POM xml
Step 4: Once you click finish on above screen , the next screen will appear like below. This is your project structure now.

Maven structure
Step 5: Please add the below in pom.xml. Here you can add all of your dependency, properties etc.,


  4.0.0
  com.test
  helloworld
  0.0.1-SNAPSHOT


   org.springframework
   spring-core
   ${spring.version}
  
  
   org.springframework
   spring-context
   ${spring.version}


  3.2.3.RELEASE


Step 6: Once you configured pom xml, next you should add application context xml for your project bean definition. So , create one xml like below under src/main/resources.

Spring context xml
Once xml file was created, add the below bean definitons.


Step7 : After adding application context xml, add your java class with the name of  HelloService. That java class looks like below.

package com.test.helloworld;

import org.springframework.stereotype.Service;
 
@Service("helloWorld")
public class HelloService {
 
 private String name;
 
 public void setName(String name) {
  this.name = name;
 }
 
 public String sayHello() {
  return "Hello ! Spring + Maven Test by " + name;
 }
}


Note: Here @Service annotation is not mandatory, without this also program will run. But in generally, its good to add before call will go from this class to any DAO class etc.,

Step 8: The above java class implemented at service layer level. So I used there @Service annotation. We can see it deeply later.

Now I need to test it, means should call above java class from HelloTest java class. The implemented class for HelloTest is below.

package com.test.helloworld;

import org.springframework.context.ApplicationContext;
import org.springframework.context.support.ClassPathXmlApplicationContext;

public class HelloTest {
  
 
 public static void main(String[] args) {
 
  // loading bean definitions from applicationcontext.xml
  ApplicationContext context = new ClassPathXmlApplicationContext(
    "applicationContext.xml");
 
  HelloService service = (HelloService) context
    .getBean("helloWorld");
  String message = service.sayHello();
  System.out.println(message);
 
  //set your new name
  service.setName("Setting again new name : TestHelloWorld ");
  message = service.sayHello();
  System.out.println(message);
 }
}


Step 9 : Next we should and clean and build through maven. You can directly run this application from main method of HelloTest java. Since it is a maven project, it is advice to follow through clean and install maven option .

Right click on your pom xml or on project , select Run As --> Maven Clean.
Below images will explain clearly.

maven clean

Step 10 :  Once maven clean done, you should build the application.

Right click on your pom xml or on project , select Run As --> Maven Install. It will build your project. The below images will explain that.

install

Step 11: After build your project , you able to see below screen. In case if your project have any Test class(Junit) it will refelect in console tab.

console
Step 12: After finishing maven clean and install, Run your application .

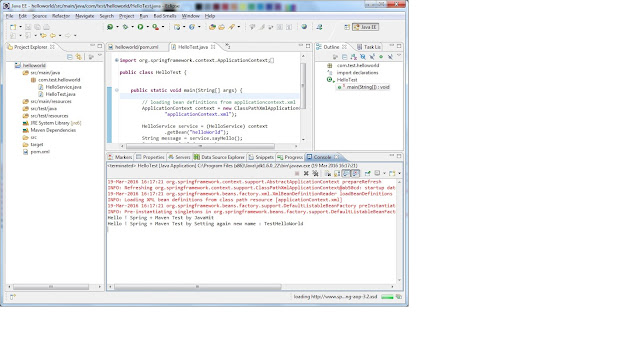
Right click on HelloTest program, Run As --> Java application. Below output we can see.

Console Output
Please raise comment in case if you have any clarification.

Thats All. Happy learning!

Friday, March 18, 2016

WSDL checking through SOAP UI Tool

With the help of SOAP UI Tool, we could check our WSDL file. While providing request data , it will display response data, if your wsdl is fine. Else it may through any exception while submitting request to end point.

The below screenshot will explain , how to check wsdl.

Step 1: Create a New SOAP Project
            File -->New SOAP Project --> It will display pop up like below screenshot. Here, you have to provide project name and you must import your project wsdl file.


Step 2: Once you created project, just expand + symbol based on your project method. (In my sample project it is addValue). After expand that, you able to see request1. Click on that. Below pop up will open.


Step 3: The request asking , you should provide input parameter to request xml. After entering input details, click on left corner Green Arrow Icon(Submit End point). It will show the response XML in next screen like below.


Now your WSDL is working fine, if it is not throwing any exception. 

Thursday, March 17, 2016

Soap Web Service Example - Simple Calculator

Hi All, The below is simple SOAP calculator example. I have created this with below technologies.

1. Eclipse Indigo IDE
2. Apache Tomcat 6
3. Apache Axis

Step 1: Create one dynamic project which name is SimpleCalculator


Step 2: Cretae one package like com.ws.calculator and write one Calculator java class with four methods for addition, substration, multiplication and division.


Step 3: Once Calculator class is created, next you need to create web services through Bottom Java bean approach. I was forget to tick (Checkbox) Publish the web Service and Monitor the web service. Please tick it.


 Step 4:  Click Next button, Now you able to see which style you have to follow for soap web service. You can choose document / literal .
 Step 5: After that click Next, continuosuly it will ask click Next. From your Calculator java code Calculator wsdl will be generated, this concept is called Bottom Up. You can see below, generated wsdl file.


 Step 6: Click Launch button, Eclipse browser will open like below.


 Step 7: Now SimpleCalculatorClient code also generated. Click addition(int,int) method. It will ask you provide two inputs. Once you provide inputs , bottom you able to see correct result like below.

Step 8: We know soap will process all request and responses in the XML format only. Below I provided screenshot for requesting addtion method in the XML format.

Step 9: You can see below response result in the XML format for the above request XML.


Thats ALL.  Happy Learning! Any doubts please raise in comment.


Tuesday, March 15, 2016

JDK and Maven PATH Settings

JDK and Maven Path settings are very easy to configure in environment variables. The below process will explain.

1.Goto your environment variable and click on that button.

2. Under System variables, click on New button. It will give you an option to add the below two fileds.

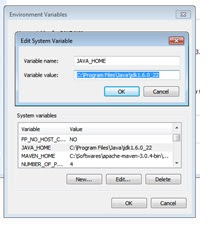
Variable Name:     JAVA_HOME
Variable Value:     C:\Program Files\Java\jdk1.6.0_31

java path set
Java Path Setting

3. If you need you can configure maven , else leave maven configuration step.

For maven configuration, again click New button, it will ask you to enter variable name and variable value like step 2.

Variable name :    MAVEN_HOME
Variable value :    C:\Softwares\apache-maven-3.0.4-bin\apache-maven-3.0.4

maven path
Maven Path settings

Once you finished both JAVA_HOME and MAVEN_HOME, we should add it in User variable like below. Please carefully place ; and \bin; (copy and paste it).

Variable name : PATH
Variable value : %JAVA_HOME%;%MAVEN_HOME%\bin;


java and maven
Java and Maven path settings
Once you finish click Ok. Thats all.


Friday, March 11, 2016

Which one developer should use for writing file , FileOutputStream or FileWriter ?

Well, Good question. But all developer will get struggle to choose to write file. Developer should choose based on his/her requirements.

1. FileOutputStream -  Write the file in the streams of raw bytes like IMAGE.
2. FileWriter - Writting streams of characters (Text type of data)

software being installed m2e - slf4j over logback logging (optional) 1

Almost most of the developers are facing this issue and its getting irritate. But its simple to solve by below ways.

1.Go to help – Install new software
2.Add the below URL.
   2.1. http://download.eclipse.org/releases/indigo/
3.Add it. Once you after add, it will load all list.
4.After list loads, Under "General Purpose Tools" check "m2e - Maven Integration for Eclipse".
5.Continue with your installation to proceed further.
6.Once done, eclipse will ask you to restart eclipse.
7. Restart it. PROBLEM SOLVED.

Tuesday, March 8, 2016

Create Singleton with Thread-Safe

Many blog could teach you how to write singleton but somebody may interest to face singelton with thread safe. We can see the below example for create the singleton instance with thread safe.

The below code will also explain What is volatile keyword and its responsibilty.

private static volatile Test instance;

public static Test getInstance () {

if (instance == null) {

synchronized (Test.class) {

instance = new Test();

}

}

return instance;

}

}


From the above, We know static will execute at first as per java rules. Here we able to see volatile keyword, which will create that instance in Main memory. The reason behind for adding volatile here is, we need multi threading task should be happened with the help of that instance. A lot of parallel threads will load simultaneously and if they want to access the instance, which should be in Main memory. The below picture will represent clearly.

Volatile
Volatile with Thread Safe Explanation
Hope you understand volatile purpose here. Suppose if volatile is not used. some thread could access instance as NULL.