Monday, May 30, 2016

JSP Interview Questions and Answers

1. Can you tell me JSP life cycle methods and JSP life cycle phases ?

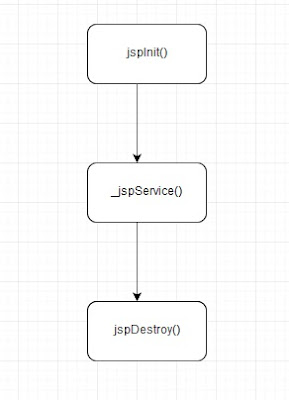
JSP Life Cycle methods
 
Jspinit()      - It will be invoked when the JSP page is initialized.

_jspService()  - It corresponds to the body of the jsp page and it will be handle for requests  
                 and response for all seven HTTP methods ie. GET, POST, DELETE etc.

jspDestroy()   - CleanUp activity will be handled by this method.

Refer for flow diagram

JSP Life Cycle Phases

1. Translation phase
2. Compilation phase
3  Instantiation phase
4  Initialization phase
5  Servicing phase
6  Destruction phase

2. What are the Directives in Jsp?

jsp engine will use this as a translation time instruction.

1. Page directive
2. Include directive
3. Taglib directive

3. What are the Jsp Implicit Objects?

Implicit objects will be created by container and developer no need to create it explicitly. Totally 9 implicit objects are available in jsp.

    1. out
    2. request
    3. response
    4. config
    5. application
    6. session
    7. pagecontext
    8. page
    9. exception

4. Difference between include directive and include action?

include directive -
<%@ include>

1. It will be processed at translation time.

2. It wil be static
<%@ include file="header.html" %>

3. You can not pass parameters.


include action (jsp:include )

1. It will be processed at run time.

2. It will be dynamic.

             <jsp:include page="header.jsp" />

              header.jsp will be addded at request time.

3. We can pass parameters by using below.

             <jsp:include page="header.jsp">
                   <jsp param name="menu" value="obj1"/>
             </jsp:include>

5.  Is there anyway to disable session in JSP ? 

Yes,  by using page directive

<%@ page session="false" %>

6.  How to handle exception in JSP and explain?

Two ways we can handle exception in JSP

1. By using isErrorPage and errorPage of page directive attributes.
2. By using <error-page> tag in Deployment Descriptor. (web.xml)


1.1 isErrorPage

<%@ page isErrorPage="true" %>
<html>
<body>
<b> Sorry! This requested page not availbale </b>
<img src="ErrorImage.jpg"/>
</body>
</html>

The above file (Error.jsp) will be executed if any error occurred. Error will be identified by using page directive attribute of isErrorPage. Remember it will be developed only to display error.

1.2 errorPage

It will tells to the Web Container that if any exception occurred at particular page, then forward the request to an error page. So both are totally different logic, but for error purpose only. 

<%@ page errorPage="error.jsp">

<html>
<body>

<!-- Your logical code and any exception occurred while executing this -->

</body>
</html>

 2. <error-page> tag in Deployment Descriptor

It will give some good option to handle error. You should define this web.xml

For all type of Exception

<error-page>
<exception-type>java.lang.Throwable</exception-type>
<location>/error.jsp</location>
</error-page>

For particular exception
<error-page>
<exception-type>java.lang.ArithmeticException</exception-type>
<location>/error.jsp</location>
</error-page>

For HTTP Status code
<error-page>
<error-code>404</error-code>
<location>/error.jsp</location>
</error-page>

<error-page>
<error-code>404</error-code>
<location>/error.jsp</location>
</error-page>

7. What are the action tags in JSP ?

Action Tag Tag Description
jsp:forwardforward the request to a new page
jsp:getProperty    retrieve a property from a JavaBean instance.

jsp:include
include the runtime response of a JSP page.
jsp:plugin
Generates client browser-specific construct that makes an OBJECT or EMBED tag for the Java Applets
jsp:useBean
instantiates a JavaBean
jsp:param
Adds parameters to the request
jsp:elementDefines XML elements dynamically
jsp:textUse to write template text in JSP pages and documents.
jsp:setProperty
store data in JavaBeans instance.
jsp:fallbackSupplies alternate text if java applet is unavailable on the client
jsp:bodyUsed within standard or custom tags to supply the tag body.
jsp:attributedefines dynamically defined XML element's attribute

8.Differentiate between response.sendRedirect(url) and <jsp:forward page > ?

jsp:forward - It will forward one request object to another , which is to be HTML, servlet or JSP.  But important point here is, it should be within application context. (Application).

sendRedirect (url) - It will transer one request to another resource , which is to be different domain or different server.

9.  How you can implement thread safe in jsp ?

To make JSP as thread-safe, you can implement the SingleThreadModel interface , which prevents two threads from accessing the service method at the same time.

The JSP page by default is not thread safe, if you want to make it thread safe then you should add following directive in your JSP page declaration:

<%@ page isThreadSafe="false" %>

10. Is JSP technology extensible?

Yes, JSP is easily extensible witht the help of modification of tags, custom actions etc.,

11.  How will you pass information from one JSP to another JSP?

<Jsp:param> allows us to pass information between multiple Jsp’s.

12. Why does _jspService() start with an ‘_’ but other lifecycle methods does not start ?

The reason is, we should not override _jspservice method, since it will be executed by container. But remaining two methods we can override. 


So '_'  representing here, we should should not override. If you override compiler will give an error.

13.  How to avoid session created automatically in JSP?

 <%@ page session=”false”  %>

14.  What are the various scope values for <jsp:useBean> ?

1)application

2)request

3)page

4)session


15. How to disable java code or scripting in JSP page?

We should add below code in deployment descriptor(web.xml)
   

<jsp-config>
    <jsp-property-group>
        <url-pattern>*.jsp</url-pattern
        <scripting-invalid>true</scripting-invalid>
    </jsp-property-group>
</jsp-config>
 
Here, it will disable all jsp page , but you want to allow to any special jsp then you should add that JSP file name manually.
Friday, May 27, 2016

Jsp Life Cycle and phases flow diagram

JSP Life Cycle Methods

1. jspInit()
2. _jspService()
3. jspDestroy()

life cycle
Jsp life cycle methods


    Jspinit()          - It will be invoked when the JSP page is initialized.

    _jspService()  - It corresponds to the body of the jsp page and it will be handle for requests   
                              and response for all seven HTTP methods ie. GET, POST, DELETE etc.

   jspDestroy() -   CleanUp activity will be handled by this method.

JSP Life Cycle Phases

1. Translation phase
2. Compilation phase
3  Instantiation phase
4  Initialization phase
5  Servicing phase
6  Destruction phase


Thursday, May 19, 2016

Spring MVC Tutorial part IV - How to use RequestParam annotation

@RequestParam

It will be used in query string to bind the parameter with controller method parameters. We can see some possibility way of using request param.

1. Simple Request Param

@RequestMapping(value = "/order/details", method = RequestMethod.GET)
  public String orderDetails(@RequestParam("orderDevice") String device,
                             Model model) {
    return "orderDetails";
  }

In the above method, the URI will be formed like /order/details?orderDevice=Laptop and where Laptop is value of orderDevice argument.

2. Request Param with Required attribute

@RequestMapping(value = "/order/details", method = RequestMethod.GET)
  public String orderDetails(@RequestParam("orderDevice", required=false)
                             String device, Model model) {
    return "orderDetails";
  }  

If the value is missing for the orderDevice parameter, which value will be set to null,  else value will be passed as usual.

Note:
Required attribute default value is True. If the parameter is missing status code 400 will be returned.

3. Request Param with Default value

@RequestMapping(value = "/order/details", method = RequestMethod.GET)
  public String orderDetails(@RequestParam("orderDevice",
                       defaultValue="MobileDevice") String device, Model model) {
    return "orderDetails";
  }

If the value is missing for the orderDevice parameter, which value will be set to MobileDevice as a default value.

4. Request Param with multiple param values

@RequestMapping(value = "/order/details", method = RequestMethod.GET)
  public String orderDetails(@RequestParam("orderDevice") String device, 
                       @RequestParam("deviceId") String deviceId, Model model) {

   model.addAttribute("msg", "Order device and its Id : "+
                                                 device+", "+deviceId);
   return "orderDetails";
  }

Above will be mapped to /order/details?orderDevice=Laptop&deviceId=123

5. Request Param with Map object

@RequestMapping(value = "/order/details", method = RequestMethod.GET)
  public String orderDetails(@RequestParam Map<String, String> queryMap,
                             Model model) {

   String device = queryMap.get("orderDevice");
   int deviceId = queryMap.get("deviceId");

   model.addAttribute("msg", "Order device and its Id : "+
                                                 device+", "+deviceId);
   return "orderDetails";
  }

From the above, both orderDevice and deviceId mapped to Map object with the help of requestParam annotation. So you access with Map object like above code.

URI will be like /order/details?orderDevice=Laptop&deviceId=123

6. Request Param with possibility ambiguous

@Controller
@RequestMapping("/Electronics")
public class ElectronicsController {

@RequestMapping(value = "/order/details", method = RequestMethod.GET)
  public String orderDetails(@RequestParam("orderDevice") String device, 
                              Model model) {

   return "orderDetails";

  }


@RequestMapping(value = "/order/details", method = RequestMethod.GET)
  public String orderDetails(@RequestParam("deviceId") String deviceId, 
                              Model model) {

   return "orderDetails";

  }
}

Above method make Run time exception, since complain about ambiguous mapping. Exception is look like Caused by: java.lang.IllegalStateException: Ambiguous mapping.

Tuesday, May 17, 2016

Spring MVC Tutorial part III - How to use pathVariable annotation

@PathVariable Annotation

We can make dynamic URIs with the help of PathVariable annotation. You can map this pathVariable argument with Map object. Let us check below code. 

@Controller

 public class orderController {

 @RequestMapping("/orderDetails/{orderName}")
        public String showOrder(Model model, @PathVariable("orderName") String orderName) {

             model.addAttribute("orderName", orderName);

             return "showOrder"; // view name
     }
 }

From the above , the URI will from like below. Just assume you are running locally,

For Laptop order, URI like below,
http://localhost:8080/orderDetails/LaptopOrder

For Desktop order, URI like below,
http://localhost:8080/orderDetails/DesktopOrder

Some people may get confuse about request param and pathVariable. Both are different. Above URI is the example for pathVariable.
Below is the example for request param . 
http://localhost:8080/orderDetails?orderName=LaptopOrder

@PathVariable with Map

@RequestMapping(value="/{orderName}/{userName}",method=RequestMethod.GET)
public String getOrderUserName(@PathVariable Map<String, String> pathVars, Model model) {

    String name = pathVars.get("userName");
    String order = pathVars.get("orderName");

    model.addAttribute("msg", "Test" + name + " Spring MVC " + order);
    return "home";// ViewName
}

From the above, we have used Map<String, String> to map pathVariables for orderName and userName. After that, whenever data need , you can retrieve from pathVars map object.

Note: 

<mvc:annotation-driven /> needs to be added into your dispatcher-servlet.xml file. It will give an explicit support for mvc controllers annotation. Means, @RequestMapping, @Controller etc.,

<context:annotation-config> - It will support @Autowired, @Required , @PostConstruct etc.,

Spring MVC Tutorial Part II - Hello World Example

Spring MVC Hello World

Topics covered
1. Create Maven Project
2. Spring Dependency by Maven pom
3. Web.xml
4. Controller class
5. Displaying Views

Maven Project Creation

Create a new maven project called SpringMVC in eclipse. File --> new --> other --> Maven Project. After creating maven project , add tomcat as your application server in eclipse.

pom.xml

All the dependencies should be added here for Spring MVC configuration.  pom.xml code is below.
 
<project 
        xmlns="http://maven.apache.org/POM/4.0.0" 
        xmlns:xsi="http://www.w3.org/2001/XMLSchema-instance"
 xsi:schemaLocation="http://maven.apache.org/POM/4.0.0 
        http://maven.apache.org/maven-v4_0_0.xsd">
 <modelVersion>4.0.0</modelVersion>
 <groupId>com.javahit</groupId>
 <artifactId>SpringMVC</artifactId>
 <packaging>war</packaging>
 <version>0.0.1-SNAPSHOT</version>
 <name>SpringMVC Hellow World</name>
 <url>http://maven.apache.org</url>

 <!--Spring version -->
 <properties>
  <spring.version>4.2.1.RELEASE</spring.version>
 </properties>

 <dependencies>

  <!-- Spring dependencies Start-->
  <dependency>
   <groupId>org.springframework</groupId>
   <artifactId>spring-core</artifactId>
   <version>${spring.version}</version>
  </dependency>

  <dependency>
   <groupId>org.springframework</groupId>
   <artifactId>spring-webmvc</artifactId>
   <version>${spring.version}</version>
  </dependency>

  <dependency>
   <groupId>org.springframework</groupId>
   <artifactId>spring-web</artifactId>
   <version>${spring.version}</version>
  </dependency>
  <!--Spring dependencies End-->
 </dependencies>
 <build>
  <finalName>SpringMVC</finalName>
 </build>
</project>

web.xml with Dispatcher Servlet

<web-app>
 
 <context-param>
  <param-name>contextConfigLocation</param-name>
  <param-value>/WEB-INF/dispatcher-servlet.xml</param-value>
 </context-param>

 <listener>
  <listener-class>
   org.springframework.web.context.ContextLoaderListener
  </listener-class>
 </listener>

 <servlet>
  <servlet-name>dispatcher</servlet-name>
  <servlet-class>
   org.springframework.web.servlet.DispatcherServlet
  </servlet-class>
  <load-on-startup>1</load-on-startup>
 </servlet>

 <servlet-mapping>
  <servlet-name>dispatcher</servlet-name>
  <url-pattern>/SpringMvc/*</url-pattern>
 </servlet-mapping>
</web-app>

dispatcher-servlet.xml

<beans xmlns="http://www.springframework.org/schema/beans"
 xmlns:context="http://www.springframework.org/schema/context"
 xmlns:xsi="http://www.w3.org/2001/XMLSchema-instance"
 xsi:schemaLocation="
http://www.springframework.org/schema/beans
http://www.springframework.org/schema/beans/spring-beans.xsd
http://www.springframework.org/schema/context
http://www.springframework.org/schema/context/spring-context.xsd">

 <context:component-scan base-package="com.javaHit.controller"/>

 <bean class="org.springframework.web.servlet.view.InternalResourceViewResolver">
  <property name="prefix">
   <value>/WEB-INF/views/</value>
  </property>
  <property name="suffix">
   <value>.jsp</value>
  </property>
 </bean>
</beans>

Controller Class

        package com.javaHit.controller;

 import org.springframework.stereotype.Controller;

 import org.springframework.ui.ModelMap;

 import org.springframework.web.bind.annotation.RequestMapping;

 import org.springframework.web.bind.annotation.RequestMethod;


 @Controller

 @RequestMapping("/helloWorld")

 public class HelloWorldController {

         @RequestMapping(method = RequestMethod.GET)

         public String hello(ModelMap model) {  

             model.addAttribute("name", "Spring Hello World!");

             return "helloWorld";
               }

     }

Displaying Views

helloWorld.jsp

<html>

 <body>

     <h1>Spring MVC Test</h1>
     <h3>Name : ${name}</h3>

 </body>
   </html>

Run the Application

Hit the URL, http://localhost:8080/SpringMvc/helloWorld

localhost:8080   -- Your local host( tomcat)
SpringMvc         -- Configured in web.xml for dispatcher
helloWorld         --  To execute correct Controller class (Request Mapping)

From the controller class method output string "helloworld", it will add both prefix and suffix to execute view page.

Monday, May 9, 2016

Spring MVC Tutorial Part I

MVC Architecture

The Spring MVC frameworks provides a good concept Model View Controller architecture. Lets see the definition of MVC. Generally you may find different definitions for MVC.Its an web application development framework.

Model - Its the application data, and its just not only the data. It may have any logic which is produce data for your application.

View - It will rendering model data and generates the HTML output to the client browser.

Controller - Its the responsibility to process your requests with the help of model and passes to view for rendering.

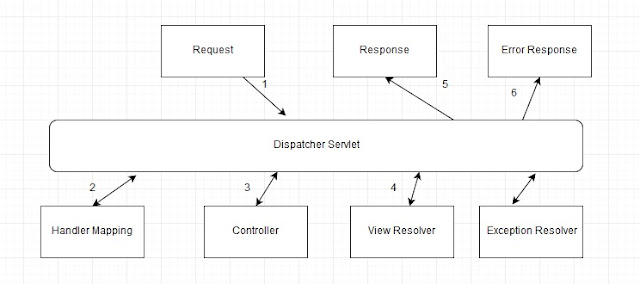
The Dispatcher Servlet 

It will handle all the HTTP request and responses and It is integrated with spring IOC container so that it is using all the features of spring.

Dispatcher servlet is an servlet and Its inherited from HTTPServlet base class. We should declare and mapping all request which should be handled by Dispatcher servlet. Below is the web.xml code for Dispatcher Servlet.

<web-app>

    <servlet>
        <servlet-name>exampleTest</servlet-name>
        <servlet-class>org.springframework.web.servlet.DispatcherServlet</servlet-class>
        <load-on-startup>1</load-on-startup>
    </servlet>

    <servlet-mapping>
        <servlet-name>exampleTest</servlet-name>
        <url-pattern>/example/*</url-pattern>
    </servlet-mapping>

</web-app>
So in the above code, all request will come with /example will be handled by Dispatcher Servlet. Suppose if your application have both struts and spring framework means, you need to configure ActionServlet also in web.xml. Ok, fine. Now Dispatcher Servlet initialization job is done. Now spring MVC looks for a file name called  [servlet-name]-servlet.xml in the WEB-INF directory of your web application.

In the above configuration code we have used example as a servlet name , so your  [servlet-name]-servlet.xml file will be example-servlet.xml. You can put anything as servlet name which should be used with -servlet.xml

Suppose if you like to use customize [servlet-name]-servlet.xml, then you need to configure ContextLoadListener like below. 
<web-app>

<!---DispatcherServlet definition goes here --->

<context-param>
   <param-name>contextConfigLocation</param-name><param-value>/WEB-INF/Hello-servlet.xml</param-value></context-param>

<listener>
   <listener-class>
      org.springframework.web.context.ContextLoaderListener
   </listener-class>
</listener>
</web-app>

[servlet-name]-servlet.xml (example-servlet.xml)

Code configuration is below for example-servlet.xml. It should be placed inside WEB-INF directory.

<context:component-scan base-package="com.javaHit"/>;
       <bean class="org.springframework.web.servlet.view.InternalResourceViewResolver">
          <property name="prefix" value="/WEB-INF/jsp/" />
          <property name="suffix" value=".jsp" />
       </bean>
Here, InternalResourceViewResolver will be used to access any views page like JSP, HTML, XHTML etc.,  It extends UrlBasedViewResolver that has two property i.e prefix and suffix. So the URL of view page will be make with the help of this prefix and suffix.

For example,
prefix + viewname (return from ModelAndView object) + suffix = URL of view page

We can see later what is ModelAndView object. In shorten, ModelAndView will return one name like hello.
Then page will be prefix+hello+suffix menas, /WEB-INF/jsp/hello.jsp. Hope you got it.

Its advisable and good practice to use JSP under WEB-INF for security purpose. Means, through direct URL (Manual URL) it wont give access.

Controller 

 When request come, Dispatcher Servlet delegates the request to particular controller to executes the logic or functionality. To define controller class we need to use @Controller annotation. Next we need to use @RequestMapping annotation to map an URL for an entire class or particular method. I would like to add two sample code below to understand more on Request Mapping.

Sample I - @RequestMapping with class

Sample code below
@Controller
@RequestMapping("/hello")
public class HelloController{
 
}

/hello will be used as URI for this controller class. Here we used , GET method (RequestMethod.GET) to handle the HTTP request. 

@RequestMapping(value="/methodHello")
@ResponseBody
public String methodHello(){
    return "hello";
}

Here, value attributes provides the URI for which method should be executed. @ResponseBody will  return response as String. We can do more with this @RequestMapping like how to produce response how to consume input etc.,We can see these all later as a separate post.

Now You can understand more with the help of below diagram.

MVC
Spring MVC Architecture


Wednesday, May 4, 2016

Deep copy and Shallow copy in java

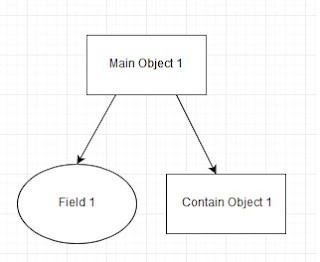
Shallow Copy:

A new object will be created that has an exact copy values of its original object. Means, it will copy all of the fields , suppose if any of the fields are object reference then reference address only will be copied. That is, reference address means, memory address.


shallow copy
Before shallow copy picture 1
Before Shallow Copy

shallow copy
After Shallow copy picture 2
                                                             After Shallow Copy

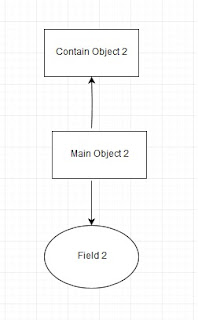
We have added here two pics, and first picture mentioning before shallow copy and second picture is after doing shallow copy. Now lets see points,

1. Initially Main object 1 have filed 1 and contain object 1.
2. After doing shallow copy Main Object 2 is created with filed 2.
3. But still contain object 2 is not created and Main object 2 is pointing contain object 1. Means, memory address copied. (reference address).
4. So if you will do any changes in Contain object 1 of Main object 1, it will reflect in Main object 2 also.

Deep copy

It will copy all of the fields and all the dynamically allocated memory address pointed by that object are also copied.  Below picture will say clearly.

Before
Before Deep Copy


After
After Deep copy
We have added here two pics, and first picture mentioning before deep copy and second picture is after doing deep copy. Now lets see points,

1. Initially Main object 1 have filed 1 and contain object 1.
2. After doing deep copy Main Object 2 is created with filed 2 and contain object 2.
3. Remember here, contain object 2 was not created in shallow, but in deep contain object 2 is created.
4. So if you will do any changes in Contain object 1 of Main object 1, it will not reflect in Main object 2 .

Shallow copy with example code


public class Subject {

 private String name;

 public String getName() {
  return name;
 }

 public void setName(String name) {
  this.name = name;
 }

 public Subject(String name) {
  this.name = name;
 }
}
Create another one class called Student and code is below
public class Student implements Cloneable {

 // Contained object
 private Subject subj;
 private String name;

 
 public Subject getSubj() {
  return subj;
 }

 
 public void setSubj(Subject subj) {
  this.subj = subj;
 }

 public String getName() {
  return name;
 }

 
 public void setName(String name) {
  this.name = name;
 }

 public Student(String name, String sub) {
  this.name = name;
  this.subj = new Subject(sub);
 }

 public Object clone() {
  // Create shallow copy
  try {
   return super.clone();
  } catch (CloneNotSupportedException e) {
   return null;
  }
 }
}
Below class is to test shallow copy
public class ShallowTest {

 public static void main(String[] args) {
  // Original Object
  Student stud = new Student("RAJA", "MATHS");
  System.out.println("Original Object : " + stud.getName() + " ---- "
    + stud.getSubj().getName());
  // Create Clone Object
  Student clonedStud = (Student) stud.clone();
  System.out.println("After Cloned Object: " + clonedStud.getName() + " ---- "
    + clonedStud.getSubj().getName());
  //Again setting new data
  stud.setName("Kumar");
  stud.getSubj().setName("CHEMISTRY");
  System.out.println("Original Object after updating: "
    + stud.getName() + " ---- " + stud.getSubj().getName());
  System.out.println("Cloned Object after updating original object: "
      + clonedStud.getName() + " ---- "
      + clonedStud.getSubj().getName());

 }

}
Output

Original Object : RAJA ---- MATHS
After Cloned Object: RAJA ---- MATHS
Original Object after updating : Kumar ---- CHEMISTRY
Cloned Object after updating original object: RAJA - CHEMISTRY

Deep copy with example code

You can use the above shallow example and do a Little bit change like below and execute it. 

public class Student implements Cloneable {

 // Contained object
 private Subject subj;
 private String name;

 
 public Subject getSubj() {
  return subj;
 }

 
 public void setSubj(Subject subj) {
  this.subj = subj;
 }

 
 public String getName() {
  return name;
 }

 
 public void setName(String name) {
  this.name = name;
 }

 public Student(String name, String sub) {
  this.name = name;
  this.subj = new Subject(sub);
 }

 public Object clone() {
  // For deep copy
  Student student = new Student(name, subj.getName());
  return student;
 }

}
The only difference here, we are creating new object inside clone method and returning.

Tuesday, May 3, 2016

How to avoid concurrent modification exception in java with Array List

There are some possible ways to avoid concurrent modification exception in java. we can see some possibility ways with example code.

Example I 

If you will try to remove an elements from an array list like below you will get concurrent exception. 
Code below.
for (String str : yourArrayList) {
        if (condition) {
            yourArrayList.remove(str);
        }
}

Solution for the above code:

You should use Iterator and its remove() method to do this. You should not use directly remove() method of array list.

Iterator<String> it = yourArrayList.iterator();

while (it.hasNext()) {
    String str = it.next();

    if (condition)
        it.remove();
}

Example II

 
Suppose if you are not interested to use iterator here, you can choose another option. Means, you should use another array list , which needs to add all of your removable objects. Code below.
ArrayList toRemoveElements = new ArrayList();
for (String str : yourArrayList) {
    if (condition) {
        toRemoveElements.add(str);
    }
}
yourArrayList.removeAll(toRemoveElements);


Example III

There is a third option you can use CopyOnWriteArrayList. Code below.
List<String> yourList = new CopyOnWriteArrayList<String>();
    yourList.add("A");
    yourList.add("B");

    for( String str : yourList )
    {
      if( condition )
      {
        yourList.remove( new String("B" ) );
      }
    }