Wednesday, April 27, 2016

Spring Bean Life Cycle

Spring Bean Life Cycle

Spring beans are managed by Spring IOC container. Various types of life cycle interfaces will be involved during bean life cycle by this container.

If any bean want to be used by application some initialization process needs to be followed and the same way for destroying some destroying process needs to follow. Spring container following some process and this process we are calling as Bean Life Cycle.

Flow Diagram Overview

Bean
Spring Bean Life Cycle Diagram

Order of Execution:

1. IOC container look for the spring bean definition in the configuration file.
2. Once find container will create instance of the bean by using Java Reflection API.
3. If any properties mentioned, it will be populated and Dependency will be injected.
4. If the bean implements InitializingBean interface then it should implements its method
 void afterPropertiesSet() throws Exception;
5. If the bean implements DisposbleBean interface then it should implements its method
void destroy() throws Exception;

The above process is looks like simple, but mostly its not recommended since it will create tight coupling.
6. If the bean implements any of the following Aware interfaces for the specific behavior, then that process will be started with its methods. See, if you are implements any of the following, then only it will be executed. 

1. ApplicationContextAware
2. ApplicationEventPublisherAware
3. BeanClassLoaderAware
4. BeanFactoryAware
5. BeanNameAware
6. LoadTimeWeaverAware
7. MessageSourceAware
8. NotificationPublisherAware
9. ResourceLoaderAware

Below sample code implementing all of above interfaces and overriding its methods.
public class TestBean implements ApplicationContextAware,
        ApplicationEventPublisherAware, BeanClassLoaderAware, BeanFactoryAware,
        BeanNameAware, LoadTimeWeaverAware, MessageSourceAware,
        NotificationPublisherAware, ResourceLoaderAware
{
    @Override
    public void setResourceLoader(ResourceLoader arg0) {
        // TODO Auto-generated method stub
    }
 
    @Override
    public void setNotificationPublisher(NotificationPublisher arg0) {
        // TODO Auto-generated method stub
 
    }
 
    @Override
    public void setMessageSource(MessageSource arg0) {
        // TODO Auto-generated method stub
    }
 
    @Override
    public void setLoadTimeWeaver(LoadTimeWeaver arg0) {
        // TODO Auto-generated method stub
    }
 
    @Override
    public void setBeanName(String arg0) {
        // TODO Auto-generated method stub
    }
 
    @Override
    public void setBeanFactory(BeanFactory arg0) throws BeansException {
        // TODO Auto-generated method stub
    }
 
    @Override
    public void setBeanClassLoader(ClassLoader arg0) {
        // TODO Auto-generated method stub
    }
 
    @Override
    public void setApplicationEventPublisher(ApplicationEventPublisher arg0) {
        // TODO Auto-generated method stub
    }
 
    @Override
    public void setApplicationContext(ApplicationContext arg0)
            throws BeansException {
        // TODO Auto-generated method stub
    }
}


7. Suppose in your configuration file, bean uses init-method attributes , then that method will be called. Sample configuration code below. 


8. Same way bean configuration uses default-destroy-method attributes , then that method will be called . Above sample configuration code have that.

Below is the simple custom init and destroy method.
public class TestBean 
{
    public void customInitmethod() 
    {
        System.out.println("Custom Init() invoked");
    }
 
    public void customDestroymethod() 
    {
        System.out.println("CustomDestroy() invoked");
    }
}

Thursday, April 21, 2016

Hibernate One to Many Relationship with Example

One to may relationship can occur between two tables and where one table row can have multiple matching rows from other table. In hibernate also same concept with the name of Entity.

How its occurring ?

As usual, by the help of primary key Foreign key relationship.

One To Many (XML Mapping)

We have taken two model classes to describing this relationship. Item class and ItemRecord class.

Item.java 


package com.javahit.items;

import java.util.HashSet;
import java.util.Set;

public class Item implements java.io.Serializable {

 private Integer itemId;
 private String itemCode;
 private String itemName;


 private Set<itemrecord> itemRecords = 
    new HashSet<itemrecord>(0);

 //getter setter
}

ItemRecord.java

package com.javahit.items;

import java.util.Date;

public class ItemRecord implements java.io.Serializable {

 private Integer itemRecordId;
 private Item item;
 private Float price;
 private Long volume;


 //getter & setter
}

Hibernate XML Mapping file

For the above two model classes we should create hibernate mapping files.Lets see , how its look like

item.hbm.xml


inverse = true specifies, which side the relationship(One to Many , Many to Many) should take care. Mostly it will be come with these two relationship only.

lazy specifies, whether to load child objects(tables) or not, while loading parent object.(tables).

fetch = "select" - do a lazy load for all collection and entities. Remaining possible strategies are below.
fetch = "join" - It will disable lazy load , so all collection and entities will be loaded always.
fetch = "batch-size" - You can mention batch size here to fetch collection and entity data.
fectch = "subselect" - It will make your collection group into a subselect.

itemRecord.hbm.xml


Hibernate Configuration xml

Now configure your two model classes hbm xml as well as db driver, userName, pwd etc details.


    com.mysql.jdbc.Driver
    jdbc:mysql://localhost:3310/testdb
    sa
    password
    org.hibernate.dialect.MySQLDialect
    true
    true


Store Data

This is our final java class file which contains hibernate configuration logic and one to many working code.

package com.javahit;

import java.util.Date;
import org.hibernate.Session;
import com.javahit.items.Item;
import com.javahit.items.ItemRecord;


public class StoreAndRetreive {
 public static void main(String[] args) {
 
 Configuration cfg=new Configuration();    
        cfg.configure("hibernate.cfg.xml");  
    
        SessionFactory sf=cfg.buildSessionFactory();    
        Session session=sf.openSession();    
        Transaction tx=session.beginTransaction();

 Item item = new Item();
        item.setItemCode("1001");
        item.setItemName("Item Name");
        session.save(item);
        
        ItemRecord itemRecords = new ItemRecord();
        itemRecords.setPrice(new Float("5.2"));
        itemRecords.setVolume(10L);
        
        itemRecords.setItem(item);        
        item.getItemRecords().add(itemRecords);

        session.save(itemRecords);

 tx.commit();
 System.out.println("Sucess");
 }
}

Wednesday, April 13, 2016

Static Binding vs Dynamic Binding

In java two types of binding is available.

1. Static Binding

2. Dynamic Binding

Before seeing the code example remembering below points may help you to understand easily. 


1. Static binding in java will occur at compile time only. It also known as early binding.
2. Dynamic binding in java will occur at run time only. It also known late binding.
3. Static binding will happen through method overloading only. 
4. Dynamic binding will happen through method overriding only. So obviously class needs to be extended.

Example of Static Binding

public class StaticBindingTest {
 
    public static void main(String args[])  {

       List myList = new ArrayList();
       StaticBindingTest obj = new StaticBindingTest();
       obj.test(myList);
     
    }
   
    public Collection test(List c){
        System.out.println("Inside List test method");
        return c;
    }
   
    public Collection test(ArrayList as){
        System.out.println("Inside ArrayList test method");
        return as;
    } 
}

Output:
Inside List test method

The compiler will decide which method needs to be executed at compile time itself. See below image

As we discussed earlier its happening through overloading. Compiler decided List myList to be passed to test method. So its printing above output. Its not listening new Arraylist. Hope you understand.

After seeing the example Dynamic binding you will understand 100% clearly about both static and dynamic.

Example of  Dynamic Binding

public class DynamicBindingTest 
{
 public static void main(String args[]) 
  {
    Vehicle vehicle = new Car(); //Vehicle is super class and Car is a sub class
    vehicle.test();       
  }
}

class Vehicle 
  {
    public void test() 
      {
           System.out.println("Inside test method of Vehicle");
      }
  }
class Car extends Vehicle 
  {
    @Override
    public void test() 
     {
       System.out.println("Inside test method of Car");
     }
}

Output: Inside test method of Car

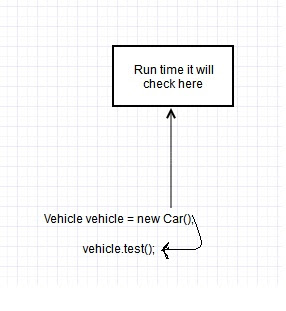
Vehicle is a super class and car is a sub class. As per rule, super class can hold sub class. So that added code like Vehicle vehicle = new Car(); See, we used here overriding. So dynamic binding.

below image will tell more, 
dynamic
Run time it will check sub class of Car and calling test method of Car class. Still confusing, simply remember compile time left side and run time right side.

Monday, April 11, 2016

Transient Keyword in java with Example

Before going to examine the Transient keyword, we should know what is serialization and de-serialization. 

What is Serialization ?

Serialization is the process of converting your object into stream of bytes and stored in a file. These process will be handled by JVM and mostly it will be involved in networking side.If any class want to be involved in serialization then it must implements serializable interface. 

What is De-Serialization ?

The same process again bring back your object states to bytes called de-serialization.

What is transient Keyword in java?

If any variables declared transient keyword in java which will not be participated in serialization. Means, It indicates to JVM the transient varibale is not part of the persistence state of an object. 

Lets see one simple example to understand further.
Person.java


import java.io.Serializable;

public class Person implements Serializable {    

    private String name;

    private int id;

    private transient String characterType;
     

    public Student(String name, int id, String characterType) {

        this.name = name;

        this.id = id;

        this.characterType = characterType;

    }

    @Override

    public String toString() {

        return "Name: " + name +

                ", id: " + id +

                ", characterType : " + characterType;

    }

}
MainTest.java
import java.io.FileInputStream;
import java.io.FileOutputStream;
import java.io.IOException;
import java.io.ObjectInputStream;
import java.io.ObjectOutputStream; 

public class MainTest {

    public static void main(String[] args) throws ClassNotFoundException {

        Person p = new Person("TestName", 1, "Good");

        System.out.println("Before serialization:" + p.toString());

        // Below is the way to Serialize of the object

        try {

            FileOutputStream file = new FileOutputStream("p.ser");
            ObjectOutputStream out = new ObjectOutputStream(file);
            out.writeObject(p);
            
            System.out.println("Object P was serialized");
            out.close();
            file.close();

        } catch(IOException e) {
            e.printStackTrace();

        }

        // Deserialization of the object.

        try {

            FileInputStream file = new FileInputStream("p.ser");
            ObjectInputStream in = new ObjectInputStream(file);
            Person p1 = (Person) in.readObject();

            System.out.println("After de-serialization :" + p1.toString());
            in.close();
            file.close();

        } catch(IOException e) {

            e.printStackTrace();

        }

    }

}

In the person java class we have used toString() to identify how the variables will be printed.Lets execute the program and check the output. 


Before serialization:
Name: TestName, id: 1, characterType: Good

Object P was serialized

After de-serialization :

Name: TestName, id: 1, characterType: null 
From the above output we able to see charaterType is null, since it used transient keyword and its not participated serialization. Remember static variables also will not participate in serialization process. Since its not belongs to any individual instance.

Lets go somewhat deep into this. 

Transient with final Keyword

Just consider you have below code with final declaration. 

private String name;
public final transient String userName = "TestUserName";
public final transient Logger logger = Logger.getLogger(Test.class);
Once we execute this above code, output will be too much different. Output is below. 
Name
TestUserName
null
As per serialization concept the TestUserName should be display value as null. But logger was displaying null perfectly. The reason is, String userName is mentioning constant Expression. logger mentioning reference. So logger returning null.

If we remove transient from both logger and userName , userName will be involved in serialization and logger will not be involved and will throw NotSerializableException

See below String API. Its implementing Serializable interface and logger not implementing.
public final class String
extends Object
implements Serializable, Comparable<String>, CharSequence

Saturday, April 9, 2016

Concurrent Hash map with example

Generally If you are modify map object during run time, you will get exception as concurrent modification exception. To avoid this java brings a good concept called concurrent hash map from java 1.5. It is placed inside java.util.concurrent package.

Let start with a simple example and we can move depth.

package com.test.javahit;

import java.util.HashMap;
import java.util.Iterator;
import java.util.Map;
import java.util.concurrent.ConcurrentHashMap;
 
public class Fruits {
 
    public static void main(String[] args) {
 
        //Declaring ConcurrentHashMap
        Map map = new ConcurrentHashMap();
        map.put("1", "1");
        map.put("2", "2");
        map.put("3", "3");
        map.put("4", "4");
        map.put("5", "5");
        map.put("6", "6");

        System.out.println("ConcurrentHashMap before using iterator: "+map);
        Iterator it = map.keySet().iterator();
        
        while(it.hasNext()){
            String key = (String) it.next();
            if(key.equals("3")) map.put("newKey", "newValue");
        }
        System.out.println("ConcurrentHashMap after using iterator: "+map);
 
        //Declaring HashMap
        map = new HashMap();
        map.put("1", "1");
        map.put("2", "2");
        map.put("3", "3");
        map.put("4", "4");
        map.put("5", "5");
        map.put("6", "6");
        System.out.println("HashMap before iterator: "+map);
        Iterator iterator1 = map.keySet().iterator();
 
        while(iterator1.hasNext()){
            String key = (String) iterator1.next();
            if(key.equals("3")) map.put("new", "newValue");
        }
        System.out.println("HashMap after using iterator: "+map);
    }
 
}

Now just run the program and check the output.
ConcurrentHashMap before using iterator: {1=1, 5=5, 6=6, 3=3, 4=4, 2=2}
ConcurrentHashMap after using iterator: {1=1, newKey=newValue, 5=5, 6=6, 3=3, 4=4, 2=2}
HashMap before iterator: {3=3, 2=2, 1=1, 6=6, 5=5, 4=4}
Exception in thread "main" java.util.ConcurrentModificationException
 at java.util.HashMap$HashIterator.nextEntry(HashMap.java:793)
 at java.util.HashMap$KeyIterator.next(HashMap.java:828)
at com.test.javahit.Fruits.main(Fruits.java:42)
From the above example, you could understand concurrent hashmap you can modify data while doing iteration and in hashMap can not.

We can see more, how its working. 

How to Initialize ?

It will be too good, if we will initialize with constructor parameters. For more understanding see below.

ConcurrentHashMap<String, Integer> concurrentHashMap = new ConcurrentHashMap<String, Integer>();

ConcurrentHashMap<String, Integer> concurrentHashMap = new ConcurrentHashMap<String, Integer>(16, 0.9f, 1);

Above two codes are just declaring the concurrent Hash Map. But Second declartion approach is good compared to first one. The reason behind is,

syntax for initializing constructor with concurrent Hash Map

ConcurrentHashMap(int initialCapacity, float loadFactor, int concurrencyLevel)

1. initialCapacity - capacity level size
2. loadFactor - Capacity level crossed means, how to add more capacity size
3. concurrencyLevel - Simply we can say thread level

As we all have good idea about first two points , but 3rd one concurrency level is just different. 16 number of concurrent threads can play with concurrent hash map. Before you set concurrency level, better to analyze more with your application. Since it will play huge performance.

Internally concurrent hash map will be divided into 16 number of participation and will assign each thread to one partition. It will maintain thread safety.  so that it will not throw any concurrent exception.

Points to Remember

1. Always use this when your project need huge concurrency level.
2. No need to synchronize separately. 
3. It performance will be good compared to synchronized hash map and hast table.
4. It wont allow both null key and null value.
5. It will lock particular portion of map only while doing update operation.

Thursday, April 7, 2016

Java Heap and Stack Memory

Heap and Stack

Heap and Stack memory will be used to execute all java programs. 

1.Heap Memory

Heap memory will be used for the purpose of storing java objects. It will allocates some memory to your java objects.

We know about Garbage collector, its running on Heap memory and clean unwanted object reference.

Whatever object is created in Heap memory, it will become Global access. 

We can set the heap memory size by the command -Xms and -Xmx with JVM. Means,  start up and maximum size of heap memory.

Most of the time , we are getting java.lang.outOfMemoryError, (Heap space error) due to heap memory size full.

2. Stack Memory

Stack memory will be used mainly while execution of thread.

Stack memory is working with LIFO(Last-In-First-Out) concept.

All variables and methods will be created in stack memory and deallocate will happen automatically.

Its faster than Heap memory while allocation

Stack memory size is less compared to Heap memory

Once method execution was done, it will become unused and next method will be ready for execution

When stack memory is full, it will throw java.lang.stackOverFlow Error

Both Heap and Stack are stored in computer RAM.

How Hashset works internally in java ?

Set and HashSet

Set in an interface , it does not allow duplicates. It can allow null value at only one time. 

Hashset implements Set Interface and It is not synchronized, so its not thread safe. It stores the object in random order. Hashset is much faster than TreeSet.

Hashset Example

HashSet set = new HashSet();
     set.add("test");
     set.add("test1");
     set.add(null);
     System.out.println("Values are" + set);

Output: Values are[null, test1, test]


To add the elements into Hashset, which is using HashMap internally
public class HashSet 
 extends AbstractSet
 implements Set, Cloneable, java.io.Serializable

 private transient HashMap<E, Object> map;

 // Dummy value to associate with an Object in the backing Map

 private static final Object PRESENT = new Object();

 public HashSet() {
    map = new HashMap<>();
 }

 public boolean add(E e) {
     return map.put(e, PRESENT)==null;
    }
add(E e) method will be called after you add the element into set. If map.put(key,value) will return null, then condition will become true. Means, map.put(e,PRESENT) will return null (null ==null so TRUE). So element will be added.

Like same, If map.put(key,value) return old value of key, then condition will become false. Means, map.put(e,PRESENT)== null will return false (value!=null). So element will not be added. 

Here PRESENT is an dummy object reference and it will be used in map. 

Wednesday, April 6, 2016

Inheritance in Hibernate

Hibernate have lot of good feature, in that Inheritance is one of the best. Its supports some of the following mapping strategies.

Single Table Per Class:
            Here both super class and sub class are mapped to same table. Another thing, one additional column need to mention to identify row is an instance of super class or sub class. 

Joined Sub Class:
            A separate table will be used for each class. The sub class table will store only the fields that are not present in the super class. So that in future, if you need to retrieve all data join need to performed on that two tables.

Table Per Class:
            A separate table will be used for each class. The sub class can store fields of super class also. So that no need to perform join to retrieve data, since sub class one row have all details.


Example of Single Table Per Class

            Already we have implemented Employee class. I have created below Skill class as a sub class of Employee.


public class Skill extends Employee {
private String skillName;
//Setter and Getter method
}

Now let’s see the mapping file for the additional field skillName. 


There is a new tag called discriminator column, which will store type information your current data.(Which class belongs to).


In our case we have created EMPLOYEE_TYPE as a discriminator and set the type to string. You can use int also. 

We have added new sub class element tag to mentioned added sub class to mention its fields and column. The subclass field skillName will be mapped to SKILL_NAME column.

session.getTransaction().begin();
Skill skill = new Skill();
skill.setFirstName("Test First Name");
skill.setLastName("Test Last Name");
skill.setSkillName("TestSkillName");
session.save(skill);
session.getTransaction().commit();


After executing this you will see below output.
Hibernate:
    drop table T_EMPLOYEE if exists
Hibernate:
    create table T_EMPLOYEE (
      ID bigint generated by default as identity,
      EMPLOYEE_TYPE varchar(255) not null,
      FIRST_NAME varchar(255),
      LAST_NAME varchar(255),
      SKILL_NAME varchar(255),
      primary key (ID)
)
Hibernate:
   insert into T_EMPLOYEE
       (ID, FIRST_NAME, LAST_NAME, SKILL_NAME, EMPLOYEE_TYPE)
   values
   null, ?, ?, ?, ’hibernate.entity.Skill’)

Example of Joined Sub Class
           
            Next we can see Joined sub class which definition already provided. See below mapping file,


            The Joined sub class tag will instruct hibernate to create table for the sub class of Skill and the table name is T_SKILL and added one new column for the purpose of accessing its parent table(Super class) T_EMPLOYEE. means, it will work as foreign key.


Once you execute this code, you will see below in console.


Hibernate:
      insert into T_EMPLOYEE
     (ID, FIRST_NAME, LAST_NAME, ID_ID_CARD)
     values
     (null, ?, ?, ?)

Hibernate:
     insert
     into
     T_SKILL
     (SKILL_NAME, ID_PERSON)
     values
     (?, ?)

Example of Table Per Class


            Next we can see table per class, its definition was provided already. see below mapping file,


You can see generator class as sequence , which will create a unique id for both table T_EMPLOYEE and T_SKILL. As usual Union-subclass tag will create a separate table T_SKILL whereas same column SKILL_NAME. 

After executing your code, you will see below in console tab.


Hibernate:
 call next value for hibernate_sequence
Hibernate:
 insert into T_PERSON (
 FIRST_NAME, LAST_NAME, ID)
values
   (?, ?, ?, ?)

Hibernate:
    call next value for hibernate_sequence

Hibernate:
    insert into T_SKILL (
 FIRST_NAME, LAST_NAME, FAV_PROG_LANG, ID)
values
   (?, ?, ?, ?, ?)