Friday, March 30, 2018

Array concat method

concat method joins the array with other arrays and/or items.

The syntax is:

arr.concat(arg1, arg2...)

Explanation:

The arguments could either arrays or values. After concat the result is a new array containing items from arr, then arg1, arg2 etc.

Below is very basic example for concat.


let arr = [1, 2];

// merge arr with [3,4]
alert( arr.concat([3, 4])); // 1,2,3,4

// merge arr with [3,4] and [5,6]
alert( arr.concat([3, 4], [5, 6])); // 1,2,3,4,5,6

// merge arr with [3,4], then add values 5 and 6
alert( arr.concat([3, 4], 5, 6)); // 1,2,3,4,5,6


Adding objects is little different. It will add as a whole. Let see a example,


let arr = [1, 2];

let arrayObject = {
  0: "something",
  length: 1
};

alert( arr.concat(arrayLike) ); // 1,2,[object Object]
//[1, 2, arrayObject]


Array slice method


The syntax is:

arr.slice(start, end)

Slice method will returns a new array where it copies all items metioned from start index "start" to "end".

Both start and end can be negative, in this case position from array end is assumed.(like splice).

Below example can illustrate more...


let str = "test";
let arr = ["t", "e", "s", "t"];

alert( str.slice(1, 3) ); // es
alert( arr.slice(1, 3) ); // e,s

alert( str.slice(-2) ); // st
alert( arr.slice(-2) ); // s,t


Things To Remember:

1. Remembering the syntax make you more stronger easily in javascript.

2. Slice end will not be added while slice operation.

3. Slice will return an array always.

4. Negative index position allowed.


Array methods splice in detail


We have already seen some array methods, now we can see some other important methods.

The syntax of splice method is,

arr.splice(index[, deleteCount, elem1, ..., elemN])

index - specifying the position.

deleteCount - specifying the count of deleted elements.( don't confuse, we can see example)


1. First let start with deletion, see below example.


let arrTest = ["I", "study", "JavaScript"]; // Index start from 0

arrTest.splice(1, 1); // from index 1 remove 1(deletedcount) element

alert( arrTest ); // ["I", "JavaScript"]


2. Remove and Replace with other elements.


let spliceTest = ["I", "study", "JavaScript", "right", "now"];

spliceTest.splice(0, 3, "Let's", "dance"); // 0 is index;
                             3 - delete count ; 
                             remaining is for insert element

alert( spliceTest ) //  ["Let's", "dance", "right", "now"]


3. How to store removed array elements ?


let normalArray = ["I", "study", "JavaScript", "right", "now"];

// remove 2 first elements
let removedArrayElement = normalArray.splice(0, 2);

alert( removedArrayElement ); // "I", "study" <-- removed elements from an array

3. I do not want to remove an elements, but I need to insert with splice. How ?


let Originalarr = ["I", "study", "JavaScript"];

// from index 2
// delete 0 --> This is important point here
// then insert "complex" and "language"
Originalarr.splice(2, 0, "complex", "language");

alert( Originalarr ); // "I", "study", "complex", "language", "JavaScript"


4. Can I go ahead with negative indexes ?

Negative indexes are allowed in splice. It specify the position from the end of the array.

-1 means, one step back from end
-2 means, two step back from end and so on....


Example is below...


let arrNegativeEg = [1, 2, 5];

// from index -2 (two step from the end)
// delete 0 elements,
// then insert 3 and 4
arrNegativeEg.splice(-2, 0, 3, 4);

alert( arrNegativeEg ); // 1,3,4,2,5


Array with loop

Some types of for loop is there to iterate an array element. Let see one by one.

1. Classical for loop

2. for..of loop

3. for..in loop


Example for classical for loop.


let arrayExampleLoop = ["Apple", "Orange", "Pear"];

for (let i = 0; i < arr.length; i++) {
  alert( arrayExampleLoop[i] );
}


 Example for for..of loop:


let fruitsForOfLoop = ["Apple", "Orange", "Plum"];

// iterates over array elements
for (let fruit of fruitsForOfLoop) {
  alert( fruit );
}


Example for for...in loop:


let arrForInLoop = ["Apple", "Orange", "Pear"];

for (let key in arrForInLoop) {
  alert( arrForInLoop[key] ); // Apple, Orange, Pear
}

For arrays , we should not use for..in loop(performance issue) . But for objects you can go.


Array Methods


1. pop/push
2. shift/unshift

Things To Remember:

       1. push appends an element to the end.

       2. shift get an element from the beginning

       3. pop takes an element from the end. (remove)


Note:

1. Pop and Push will work with end of the array.

2. Shift and unShift work with starting of the array.


Let see an example for pop,

Below will extract the last element and returns.


let test = ["Apple", "Orange", "Grapes"];

alert( test.pop() ); // remove "Grapes"

alert( test ); // Output is : Apple, Orange


Let see an example for push,

Append the element to the end of the array


let fruit = ["Apple", "Orange"];

fruit.push("Grapes");

alert( fruit ); // Apple, Orange, Grapes


Let see an example for shift,

Extracts the first element of the array and returns it.


let fruitsTest = ["Apple", "Orange", "Pear"];

alert( fruitsTest.shift() ); // remove Apple

alert( fruitsTest ); // Orange, Pear


Let see an example for unshift,


Add the element to the beginning of the array.


let unshiftExample = ["Orange", "Pear"];

unshiftExample.unshift('Apple');

alert( unshiftExample ); // Apple, Orange, Pear


How do you add multiple elements at a single operation?

see the below example,


let fruitsMultiple = ["Apple"];

fruitsMultiple.push("Orange", "Peach");
fruitsMultiple.unshift("Pineapple", "Lemon");

// ["Pineapple", "Lemon", "Apple", "Orange", "Peach"]
alert( fruitsMultiple );


Wednesday, March 28, 2018

Arrays declaration initialization add and replace

Things to remember :

          Generally we will go arrays for ordered collection or If you want to insert a property between existing ones. Object will not support in this case. So we are choosing array here.

Array elements are numbered, starting with zero.

How do we declare it ?

Below are two possible ways to declare array in javascript. Most of the time all developers preferring to use second syntax only. 


Syntax I:
let arr = new Array();

Syntax II:
let arr = [];

Below are main while using array in your project. So remember these all always.

1. Initialization
2. Get element based on index
3. Replace element
4. Add new element
5. Find length


//Array Initialization
let terms = ["Test", "Drive", "JavaScript"];

//Get elements by index number
alert( terms[0] ); // Test
alert( terms[1] ); // Drive
alert( terms[2] ); // JavaScript

//Replace an elements
terms[2] = 'Vechicle'; // now ["Test", "Drive", "Vechicle"]

// Adding new ones
terms[3] = 'Hero'; // now ["Test", "Drive", "Vechicle", "Hero"]

// Finding length or count
alert( terms.length ); // 4

Below is the style mostly developers choose for array. Its easy to understand and very clear.


let terms = [
  "Test",
  "Drive",
  "Vechicle",
]; 


Tuesday, March 27, 2018

Convert HashMap To ArrayList


1. a) Convert HashMap Keys Into ArrayList :

             We should use keySet() method of HashMap which will returns the Set containing all keys of the HashMap. After that, we should pass those while creating ArrayList.


import java.util.ArrayList;
import java.util.Collection;
import java.util.HashMap;
import java.util.Map.Entry;
import java.util.Set;

public class HelloWorld{

     public static void main(String []args){
        //Creating a HashMap object
         
HashMap<String, String> map = new HashMap<String, String>();
map.put("1", "One");
map.put("2", "Two");
map.put("3", "Three");
map.put("4", "Four");
 
//Getting Set of keys from HashMap
         
Set<String> keySet = map.keySet();
         
//Creating an ArrayList of keys by passing the keySet
         
ArrayList<String> listOfKeys = new ArrayList<String>(keySet);
System.out.println("output is :" + listOfKeys);
     }
}

output is : [1, 2, 3, 4]


b) Convert HashMap Values Into ArrayList :

           We should use values() method of HashMap which will returns all values of the HashMap. After that, we should use this to create the ArrayList. let see an example below.


import java.util.ArrayList;
import java.util.Collection;
import java.util.HashMap;
import java.util.Map.Entry;
import java.util.Set;

public class HelloWorld{

     public static void main(String []args){

//Creating a HashMap object
         
HashMap<String, String> map = new HashMap<String, String>();
 
map.put("1", "One");
map.put("2", "Two");
map.put("3", "Three");
map.put("4", "Four");
map.put("5", "Five");
//Getting Collection of values from HashMap
         
Collection<String> values = map.values();
         
//Creating an ArrayList of values
         
ArrayList<String> listOfValues = new ArrayList<String>(values);

System.out.println("output is " + listOfValues);
     }
}

output is : [One, Two, Three, Four, Five]


c) Convert HashMap Key-Value Pairs into ArrayList :

          We should use entrySet() method of HashMap which will returns the Set of Entry<K, V> objects where each Entry object represents one key-value pair. After that, We should pass this Set to ArrayList. let see below an example.


import java.util.ArrayList;
import java.util.Collection;
import java.util.HashMap;
import java.util.Map.Entry;
import java.util.Set;

public class HelloWorld{

     public static void main(String []args){

HashMap<String, String> map = new HashMap<String, String>();

map.put("1", "One");
map.put("2", "Two");
map.put("3", "Three");
map.put("4", "Four");
map.put("5", "Five");

//Getting the Set of entries
         
Set<Entry<String, String>> entrySet = map.entrySet();
         
//Creating an ArrayList Of Entry objects
         
ArrayList<Entry<String, String>> listOfEntry = new ArrayList<Entry<String,String>>(entrySet);

System.out.println("output is " + listOfEntry);
     }
}

output is : [1=One, 2=Two, 3=Three, 4=Four, 5=Five]


Saturday, March 24, 2018

Some ways to iterate set

Below are some of the ways to iterate set in java. However still lot of other ways to do the same. But these are the basic you can use at any time easily.

Let see with an example.

1. Using Iterator
2. An  enhanced for loop
3. An enhanced for loop with java8

1. Using an Iterator


import java.util.HashSet;
import java.util.Iterator;

public class IterateHashSet{ 
  public static void main(String[] args) {
     // Create a HashSet
     HashSet<String> hset = new HashSet<String>();
 
     //add elements to HashSet
     hset.add("One");
     hset.add("Two");
     hset.add("Three");
     hset.add("Four");
     hset.add("Five");
 
     Iterator<String> it = hset.iterator();
     while(it.hasNext()){
        System.out.println(it.next());
     }
  }
}

Output:
Five
One
Four
Two
Three

Note: No ordered here.- Check output carefully.

2. An enhanced for loop


import java.util.HashSet;
import java.util.Set;

public class IterateHashSet{ 
  public static void main(String[] args) {
     // Create a HashSet
     Set<String> hset = new HashSet<String>();
 
     //add elements to HashSet
     hset.add("First");
     hset.add("Second");
     hset.add("Third");
     hset.add("Fourth");
     hset.add("Fifth");
 
     for (String temp : hset) {
        System.out.println(temp);
     }
  }
}

Output:

Second
Third
First
Fourth
Fifth


3. An enhanced for loop with java8


import java.util.HashSet;
import java.util.Set;

public class IterateHashSet{ 
  public static void main(String[] args) {
     // Create a HashSet
     Set<String> hset = new HashSet<String>();
 
     //add elements to HashSet
     hset.add("Test");
     hset.add("Second");
     hset.add("Third");
     hset.add("Fourth");
     hset.add("Fifth");
 
     hset.forEach(System.out::println);
  }
}

Output:

Second
Test
Third
Fourth
Fifth


Friday, March 23, 2018

Date parse with String

The syntax for far Date.parse is ,

Date.parse(str)

You should pass string as a parameter and The string format should be: YYYY-MM-DDTHH:mm:ss.sssZ.

Explanation:

YYYY-MM-DD – is the date: year-month-day.

The character "T" is used as the delimiter.

HH:mm:ss.sss – is the time: hours, minutes, seconds and milliseconds.

Z is an optional denotes the time zone. A single letter Z that would mean UTC+0.

You can pass short like YYYY-MM-DD or YYYY or YYYY-MM also possible.


let ms = Date.parse('2018-01-21T13:45:50.417-09:00');

alert(ms);

Output: 
1516574750417


let date = new Date( Date.parse('2015-01-23T13:41:50.417-05:00') );

alert(date);
Output:
Sat Jan 24 2015 00:11:50 GMT+0530 (India Standard Time)


Accessing Date

Below are some of methods in java script to access date object.

1. getFullYear()
                            It will give the year in 4 digits. Some developers may get confuse with getYear() method. Please remember this was deprecated and sometimes it will give you two digit year. So it may lead you to provide wrong output.

2. getMonth()
                            It will give the month, means from 0 to 11.

3. getDate()
                            It will give the day of the month, from 1 to 31.

4. getHours() , getMinutes(), getSeconds() and getMilliseconds()

                           The above all will give you the corresponding time components.

5. getDay()
                           It will give day of the week and its starting from 0 (Sunday) to 6 (Saturday). Remember, the first day is always Sunday only.

6. getTime()

                           It will returns the timestamp for the date (milliseconds from the January 1st of 1970 UTC+0).


Creating Date and time

Date and Time in javascript is an in-built object.

Date Creation

There are some ways you able to create date. 

1. new Date() - No need to pass any arguments here. It will directly give the current date and time.


let now = new Date();
alert( now ); // display current date/time


2. new Date(milliseconds) - Pass milliseconds as argument.Here date calculation will be calculated after Jan 1st of 1970 UTC+0.


let Jan01_1970 = new Date(0);
alert( Jan01_1970 );

Output :
Thu Jan 01 1970 05:30:00 GMT+0530 (India Standard Time)


3. new Date(datestring) - Pass a string date here.


let date = new Date("2017-01-26");
alert(date);

Output : 
Fri Jan 26 2018 05:30:00 GMT+0530 (India Standard Time)

4. new Date(year, month, date, hours, minutes, seconds, ms) -  

The year must have 4 digits: Example 2018 2020 etc.,

The month count starts with 0 (Jan), up to 11 (Dec). Remember month starting from zero. 

The date parameter is actually the day of month, if not then 1 will be considered.

If hours/minutes/seconds/ms is absent, they could be considered as 0.


new Date(2011, 0, 1, 0, 0, 0, 0); // // 1 Jan 2011, 00:00:00
new Date(2011, 0, 1); // the same, hours etc are 0 by default


Thursday, March 22, 2018

Special Characters in Javascript

Below list of some special characters,

Character Description

\b                            Backspace
\f                            Form feed
\n                            New line
\r                            Carriage return
\t                            Tab

\uNNNN                    A unicode symbol with the hex code NNNN, for instance \u00A9 – is a
                                    unicode  the copyright symbol ©. It must be exactly 4 hex digits.

\u{NNNNNNNN}     Some rare characters are encoded with two unicode symbols, taking up to 4                                           bytes. This long unicode requires braces around it.


alert( "\u00A9" ); // It will print you copyright symbol.

alert( "\u{1F60D}" ); // It will print you smiley symbol.


All special characters should start with backslash \'.

Example I :


let specialList = "Specials:\n * One\n * Two\n * Three";

alert(specialList);
//Output: Specials:
* One
* Two
* Three


Example II :


alert( 'I\'m the World!' ); // I'm the world!

we have to prep-end the inner quote by the backslash \'. Else javascript will consider that as string end. So that we should add backslash.


Example III :


alert( `Adding backslash symbol: \\` ); // Output : Adding backslash symbol: \


To add backslash symbol in your string add lie above.


Saturday, March 10, 2018

Cloning Object in javascript

Last post , we have seen How object reference is working.But in some cases(very rare) if you want to copy exact object, means cloning, what you should do? How do you do that.

Its really a dull or tedious process.

Let see by code example,

let user = {
  name: "Kamal",
  age: 30
};

let clone = {}; // Going to clone into this empty object

// copy all properties from original into target
for (let key in user) {
  clone[key] = user[key];
}

console.log(clone);

Explanation: 

user is our original object and you have created one empty object called clone. After that , we have used for loop to iterate all the property of user object and assign the same to clone object. This loop will execute for all the properties of user. 

Checking with console log, all were copied to clone(target) object. Now you can modify your cloned object and check console. It will not affect user object. Since now cloned object is independent.

However, we have another simple way for cloning. Let see that too,

Object.assign:

Above we have used loop to iterate all the properties. So its look like some wide process. But using Object.assign() will make the process simpler.

Syntax is
Object.assign(destination[, src1, src2, src3...])

destination - Targeted object for clone
src1, src2,src3 etc., - Source object where you have to copy.

let user = { name: "Surya" };

let business = { businessType: "Cinema" };
let type = { isActor: true };

// copies all properties from business and type into user
Object.assign(user, business, type); console.log(user);

Output:
{name: "Surya", businessType: "Cinema", isActor: true}

Now everything is copied into our targeted user object.


Thursday, March 8, 2018

Objects copying by Reference

Generally, copying the object means, its not copy the exact object. Just Its copying the object reference. So exact object is different and reference is different.

We can discuss clone in next post.

Example:


let person = { name: 'Kannan', age: 21 };

let employee = person; // applied employee reference

employee.name = 'Rajni';

console.log(person.name); // Rajni

Initially person.name is Kannan but after modification by reference like employee= person, its reference will be considered and changes will reflected. please check the console log.

How do you compare ?

Once you have reference you would get a chance to check object reference. We can do it by == and === operator. However , I always use ===.


let a = {};
let b = a; // applied copy reference

alert( a == b ); // true, pointing same reference of object
alert( a === b ); // true, this also true


Wednesday, March 7, 2018

Objects with Square Brackets

Consider the below object,

let test = {
  name: "Raj",
  age: 19,
}

Here , you are going to add another one property like state and district property. If you try directly based on the last post, it will throw an error. So what the error, check below.

// syntax error will occur
test.state district = TamilNadu Chennai


To solve that, you should use square brackets.

// setting value
test["state District"] = "TamilNadu Chennai";

// getting value
console.log(test["state District"]); // 

// deleting value
delete test["state District"];

From the above, We have not used dot operator and used [] .


Another important, here you can use any reserved words like "for", "switch", "let" etc., See the below to confirm how its working.

let obj = {
  for: 3,
  switch: 2,
  return: 5
}

console.log(obj.for + obj.switch + obj.return );  // Output 10


Javascript Objects Tutorial

Objects

In Javascript object is the main topic to involve and writing more efficient code. So it should be understand clearly before moving into other chapters. Let start....

A object should be created with { .........} with some list of optional properties. Means, Its based Key value pair concepts. A key should be a string and a value can be anything.

Empty Objects :

We can create an empty object by two ways. 

1. By Constructor

2. By empty literal { } (Empty braces).


let user = new Object();
let user = {};  

A simple Object Example:

let test = {     // test is object here
  name: "Raj",  // Key Value pair concept
  age: 19        
};

Here, test is your object which have name and age properties. Raj and 19 is its values.

Add, Read and Remove operation

Adding, Reading and Removing operation is possible at anywhere. So let see one by one.

1. Add Operation

Consider our test object and I need to add one property like "qulaification:Bsc". So the following way we can add,

Syntax:

ObjectName.yourNew Propery = Value;

Example:
test.qulaification="Bsc";

Now just print like console.log(test); It will show below output.

let test = {    
  name: "Raj",  
  age: 19,
  qualification:"Bsc" //newly added value updated here     
};

2. Read Operation

By accessing the property of object with dot operator do the read operation.

Syntax:

ObjectName.propertyName;

Example:

let test = {    
  name: "Raj",  
  age: 19,
  qualification:"Bsc" //newly added value updated here     
};

alert(test.age); // print 19

3. Remove Operation

By using delete operator we can achieve this. It return true after delete get successful.  Let see the below example.

Syntax:

delete(keyword) objectName.propertyName;

Example:

let test = {    
  name: "Raj",  
  age: 19,
  qualification:"Bsc"
};

delete test.age; // Remove age property completely and return true


In next part of this chapter, we are going to see in some cases DOT operator wont work. So how do we achieve that in that scenario. Let see in next post.


Tuesday, March 6, 2018

Java script function tutorial

Function without parameter :

Below is the simple example for function without any parameter.


function welcomeMessage() {
  alert( 'Hello World!' );
}

welcomeMessage();

1. function is the keyword here

2. welcomeMessage is the function name.

3. welcomeMessage() is just calling the function.


So when you call control executes welcomeMessage() , it will call welcomeMessage function and executes the alert function inside that.

The below is little different because of variable declaration. See below,

let userName = 'Welcome';

function welcomeMessage() {
  let userName = "World"; // local variable

  let message = 'Hello, ' + userName;
  alert(message);
}

welcomeMessage();
alert( userName );

First It will show alert message like Hello World! Then after It will show Welcome. Because of variable declaration places and due to let keyword its happening.

Function with parameters :

We can also pass parameters to the function. See below example,


function welcomeMessage(msg1,msg2) {
  alert(msg1);
alert(msg2);
}

welcomeMessage("sample","Test");

Above we are passing two parameters and both were executed inside the function.

Function with returning a value :

The below we can see a function which is returning a value. Example below.


function sum(a, b) {
  return a + b;
}

let result = sum(1, 2);
alert( result ); // Output: 3

Here let result = sum(1,2) is the calling place and after executing the function , its returning value to result.

Conclusion :

These are the simple examples about function. Here the post we have used everywhere let keyword. We already saw let is a block level scope. 


Alert Prompt and Confirm dialog boxes

Alert :

Its a simple pop up dialog box, which will just show the information to developer. The below is the simple example for alert box.

alert("Test");


If you run the above code, you can expect below output,

alert
Alert Example

Prompt :

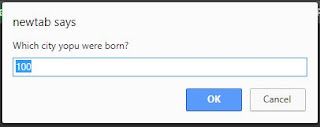
It will show a pop up window with Ok and Cancel.  The user can enter input here. Below is the syntax.

prompt(title[, default]);

let test = prompt('Which city yopu were born?', Mumbai);

If you run the above code, you can see below image.

prompt-Image
Prompt Example


Confirm :

It shows a pop up window with two buttons Ok and Cancel. Syntax is below,

confirm("Your question here ");

Generally all will use this for asking questions to the user with Ok and Cancel option.

Ok will return True value and Cancel will return False value. See the below example,


let isQulaified = confirm("Are you qualified?");

The above code return the below output.


So pressing Ok return True and Cancel return a false value.


Monday, March 5, 2018

Increment and Decrement Operator

Increment ( ++ ) and Decrement (--) operators could play a important role in our coding life especially when you would do code re fragment.

Most of the interview rounds the interviewer will ask this question and most probably targeting a freshers. Her the post I will explain what these two operators are these, and we can see some coding example.

Let start....

Increment ++ operator:

It will increase a variable by 1 always. However some logic is there when you put ++ as prefix and as post fix to the variable.

1. Post fix ++  

let counter = 2;
counter++;      //Nothing but counter = counter + 1
console.log(counter); // Output : 3

So adding a post fix , increment the variable by 1 and assign to the variable. In this case ,
counter = counter + 1.


2. ++ Prefix operator:

This is totally different from the above example even I am using the ++. See the below code and remember the applied logic. 

let b = 1;
console.log(b++);    // 1
console.log(b);      // 2

Things To Remember:

1. console.log(b++), from this line before increment b value will be printed.
2. console.log(b); from this line after increment b value taken.  Because b=b+1 was taken now.
Same concept is applicable to -- operator.

Decrement -- operator:

1. Post Fix -- operator

let c = 1;
console.log(c--);    // 1
console.log(c);  // 0

2. -- Pre Fix operator

let d = 1;
console.log(--d);    // 0
console.log(d);      // 0


The below example is little tricky and you can get now more satisfaction of understanding pre and post operators.

let count = 1;
console.log( 2 * ++count ); // 4 , because of Prefix value increment here itself


let test = 1;
console.log( 2 * test++ ); // 2, because of post fix the old value only be used here

I hope you are satisfied with the the above example.