Tuesday, May 17, 2016

Spring MVC Tutorial part III - How to use pathVariable annotation

@PathVariable Annotation

We can make dynamic URIs with the help of PathVariable annotation. You can map this pathVariable argument with Map object. Let us check below code. 

@Controller

 public class orderController {

 @RequestMapping("/orderDetails/{orderName}")
        public String showOrder(Model model, @PathVariable("orderName") String orderName) {

             model.addAttribute("orderName", orderName);

             return "showOrder"; // view name
     }
 }

From the above , the URI will from like below. Just assume you are running locally,

For Laptop order, URI like below,
http://localhost:8080/orderDetails/LaptopOrder

For Desktop order, URI like below,
http://localhost:8080/orderDetails/DesktopOrder

Some people may get confuse about request param and pathVariable. Both are different. Above URI is the example for pathVariable.
Below is the example for request param . 
http://localhost:8080/orderDetails?orderName=LaptopOrder

@PathVariable with Map

@RequestMapping(value="/{orderName}/{userName}",method=RequestMethod.GET)
public String getOrderUserName(@PathVariable Map<String, String> pathVars, Model model) {

    String name = pathVars.get("userName");
    String order = pathVars.get("orderName");

    model.addAttribute("msg", "Test" + name + " Spring MVC " + order);
    return "home";// ViewName
}

From the above, we have used Map<String, String> to map pathVariables for orderName and userName. After that, whenever data need , you can retrieve from pathVars map object.

Note: 

<mvc:annotation-driven /> needs to be added into your dispatcher-servlet.xml file. It will give an explicit support for mvc controllers annotation. Means, @RequestMapping, @Controller etc.,

<context:annotation-config> - It will support @Autowired, @Required , @PostConstruct etc.,

Spring MVC Tutorial Part II - Hello World Example

Spring MVC Hello World

Topics covered
1. Create Maven Project
2. Spring Dependency by Maven pom
3. Web.xml
4. Controller class
5. Displaying Views

Maven Project Creation

Create a new maven project called SpringMVC in eclipse. File --> new --> other --> Maven Project. After creating maven project , add tomcat as your application server in eclipse.

pom.xml

All the dependencies should be added here for Spring MVC configuration.  pom.xml code is below.
 
<project 
        xmlns="http://maven.apache.org/POM/4.0.0" 
        xmlns:xsi="http://www.w3.org/2001/XMLSchema-instance"
 xsi:schemaLocation="http://maven.apache.org/POM/4.0.0 
        http://maven.apache.org/maven-v4_0_0.xsd">
 <modelVersion>4.0.0</modelVersion>
 <groupId>com.javahit</groupId>
 <artifactId>SpringMVC</artifactId>
 <packaging>war</packaging>
 <version>0.0.1-SNAPSHOT</version>
 <name>SpringMVC Hellow World</name>
 <url>http://maven.apache.org</url>

 <!--Spring version -->
 <properties>
  <spring.version>4.2.1.RELEASE</spring.version>
 </properties>

 <dependencies>

  <!-- Spring dependencies Start-->
  <dependency>
   <groupId>org.springframework</groupId>
   <artifactId>spring-core</artifactId>
   <version>${spring.version}</version>
  </dependency>

  <dependency>
   <groupId>org.springframework</groupId>
   <artifactId>spring-webmvc</artifactId>
   <version>${spring.version}</version>
  </dependency>

  <dependency>
   <groupId>org.springframework</groupId>
   <artifactId>spring-web</artifactId>
   <version>${spring.version}</version>
  </dependency>
  <!--Spring dependencies End-->
 </dependencies>
 <build>
  <finalName>SpringMVC</finalName>
 </build>
</project>

web.xml with Dispatcher Servlet

<web-app>
 
 <context-param>
  <param-name>contextConfigLocation</param-name>
  <param-value>/WEB-INF/dispatcher-servlet.xml</param-value>
 </context-param>

 <listener>
  <listener-class>
   org.springframework.web.context.ContextLoaderListener
  </listener-class>
 </listener>

 <servlet>
  <servlet-name>dispatcher</servlet-name>
  <servlet-class>
   org.springframework.web.servlet.DispatcherServlet
  </servlet-class>
  <load-on-startup>1</load-on-startup>
 </servlet>

 <servlet-mapping>
  <servlet-name>dispatcher</servlet-name>
  <url-pattern>/SpringMvc/*</url-pattern>
 </servlet-mapping>
</web-app>

dispatcher-servlet.xml

<beans xmlns="http://www.springframework.org/schema/beans"
 xmlns:context="http://www.springframework.org/schema/context"
 xmlns:xsi="http://www.w3.org/2001/XMLSchema-instance"
 xsi:schemaLocation="
http://www.springframework.org/schema/beans
http://www.springframework.org/schema/beans/spring-beans.xsd
http://www.springframework.org/schema/context
http://www.springframework.org/schema/context/spring-context.xsd">

 <context:component-scan base-package="com.javaHit.controller"/>

 <bean class="org.springframework.web.servlet.view.InternalResourceViewResolver">
  <property name="prefix">
   <value>/WEB-INF/views/</value>
  </property>
  <property name="suffix">
   <value>.jsp</value>
  </property>
 </bean>
</beans>

Controller Class

        package com.javaHit.controller;

 import org.springframework.stereotype.Controller;

 import org.springframework.ui.ModelMap;

 import org.springframework.web.bind.annotation.RequestMapping;

 import org.springframework.web.bind.annotation.RequestMethod;


 @Controller

 @RequestMapping("/helloWorld")

 public class HelloWorldController {

         @RequestMapping(method = RequestMethod.GET)

         public String hello(ModelMap model) {  

             model.addAttribute("name", "Spring Hello World!");

             return "helloWorld";
               }

     }

Displaying Views

helloWorld.jsp

<html>

 <body>

     <h1>Spring MVC Test</h1>
     <h3>Name : ${name}</h3>

 </body>
   </html>

Run the Application

Hit the URL, http://localhost:8080/SpringMvc/helloWorld

localhost:8080   -- Your local host( tomcat)
SpringMvc         -- Configured in web.xml for dispatcher
helloWorld         --  To execute correct Controller class (Request Mapping)

From the controller class method output string "helloworld", it will add both prefix and suffix to execute view page.

Monday, May 9, 2016

Spring MVC Tutorial Part I

MVC Architecture

The Spring MVC frameworks provides a good concept Model View Controller architecture. Lets see the definition of MVC. Generally you may find different definitions for MVC.Its an web application development framework.

Model - Its the application data, and its just not only the data. It may have any logic which is produce data for your application.

View - It will rendering model data and generates the HTML output to the client browser.

Controller - Its the responsibility to process your requests with the help of model and passes to view for rendering.

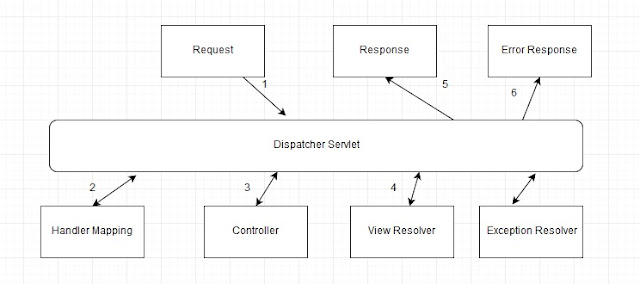
The Dispatcher Servlet 

It will handle all the HTTP request and responses and It is integrated with spring IOC container so that it is using all the features of spring.

Dispatcher servlet is an servlet and Its inherited from HTTPServlet base class. We should declare and mapping all request which should be handled by Dispatcher servlet. Below is the web.xml code for Dispatcher Servlet.

<web-app>

    <servlet>
        <servlet-name>exampleTest</servlet-name>
        <servlet-class>org.springframework.web.servlet.DispatcherServlet</servlet-class>
        <load-on-startup>1</load-on-startup>
    </servlet>

    <servlet-mapping>
        <servlet-name>exampleTest</servlet-name>
        <url-pattern>/example/*</url-pattern>
    </servlet-mapping>

</web-app>
So in the above code, all request will come with /example will be handled by Dispatcher Servlet. Suppose if your application have both struts and spring framework means, you need to configure ActionServlet also in web.xml. Ok, fine. Now Dispatcher Servlet initialization job is done. Now spring MVC looks for a file name called  [servlet-name]-servlet.xml in the WEB-INF directory of your web application.

In the above configuration code we have used example as a servlet name , so your  [servlet-name]-servlet.xml file will be example-servlet.xml. You can put anything as servlet name which should be used with -servlet.xml

Suppose if you like to use customize [servlet-name]-servlet.xml, then you need to configure ContextLoadListener like below. 
<web-app>

<!---DispatcherServlet definition goes here --->

<context-param>
   <param-name>contextConfigLocation</param-name><param-value>/WEB-INF/Hello-servlet.xml</param-value></context-param>

<listener>
   <listener-class>
      org.springframework.web.context.ContextLoaderListener
   </listener-class>
</listener>
</web-app>

[servlet-name]-servlet.xml (example-servlet.xml)

Code configuration is below for example-servlet.xml. It should be placed inside WEB-INF directory.

<context:component-scan base-package="com.javaHit"/>;
       <bean class="org.springframework.web.servlet.view.InternalResourceViewResolver">
          <property name="prefix" value="/WEB-INF/jsp/" />
          <property name="suffix" value=".jsp" />
       </bean>
Here, InternalResourceViewResolver will be used to access any views page like JSP, HTML, XHTML etc.,  It extends UrlBasedViewResolver that has two property i.e prefix and suffix. So the URL of view page will be make with the help of this prefix and suffix.

For example,
prefix + viewname (return from ModelAndView object) + suffix = URL of view page

We can see later what is ModelAndView object. In shorten, ModelAndView will return one name like hello.
Then page will be prefix+hello+suffix menas, /WEB-INF/jsp/hello.jsp. Hope you got it.

Its advisable and good practice to use JSP under WEB-INF for security purpose. Means, through direct URL (Manual URL) it wont give access.

Controller 

 When request come, Dispatcher Servlet delegates the request to particular controller to executes the logic or functionality. To define controller class we need to use @Controller annotation. Next we need to use @RequestMapping annotation to map an URL for an entire class or particular method. I would like to add two sample code below to understand more on Request Mapping.

Sample I - @RequestMapping with class

Sample code below
@Controller
@RequestMapping("/hello")
public class HelloController{
 
}

/hello will be used as URI for this controller class. Here we used , GET method (RequestMethod.GET) to handle the HTTP request. 

@RequestMapping(value="/methodHello")
@ResponseBody
public String methodHello(){
    return "hello";
}

Here, value attributes provides the URI for which method should be executed. @ResponseBody will  return response as String. We can do more with this @RequestMapping like how to produce response how to consume input etc.,We can see these all later as a separate post.

Now You can understand more with the help of below diagram.
MVC
Spring MVC Architecture


Wednesday, May 4, 2016

Deep copy and Shallow copy in java

Shallow Copy:

A new object will be created that has an exact copy values of its original object. Means, it will copy all of the fields , suppose if any of the fields are object reference then reference address only will be copied. That is, reference address means, memory address.


shallow copy
Before shallow copy picture 1
Before Shallow Copy

shallow copy
After Shallow copy picture 2
                                                             After Shallow Copy

We have added here two pics, and first picture mentioning before shallow copy and second picture is after doing shallow copy. Now lets see points,

1. Initially Main object 1 have filed 1 and contain object 1.
2. After doing shallow copy Main Object 2 is created with filed 2.
3. But still contain object 2 is not created and Main object 2 is pointing contain object 1. Means, memory address copied. (reference address).
4. So if you will do any changes in Contain object 1 of Main object 1, it will reflect in Main object 2 also.

Deep copy

It will copy all of the fields and all the dynamically allocated memory address pointed by that object are also copied.  Below picture will say clearly.

Before
Before Deep Copy


After
After Deep copy
We have added here two pics, and first picture mentioning before deep copy and second picture is after doing deep copy. Now lets see points,

1. Initially Main object 1 have filed 1 and contain object 1.
2. After doing deep copy Main Object 2 is created with filed 2 and contain object 2.
3. Remember here, contain object 2 was not created in shallow, but in deep contain object 2 is created.
4. So if you will do any changes in Contain object 1 of Main object 1, it will not reflect in Main object 2 .

Shallow copy with example code


public class Subject {

 private String name;

 public String getName() {
  return name;
 }

 public void setName(String name) {
  this.name = name;
 }

 public Subject(String name) {
  this.name = name;
 }
}
Create another one class called Student and code is below
public class Student implements Cloneable {

 // Contained object
 private Subject subj;
 private String name;

 
 public Subject getSubj() {
  return subj;
 }

 
 public void setSubj(Subject subj) {
  this.subj = subj;
 }

 public String getName() {
  return name;
 }

 
 public void setName(String name) {
  this.name = name;
 }

 public Student(String name, String sub) {
  this.name = name;
  this.subj = new Subject(sub);
 }

 public Object clone() {
  // Create shallow copy
  try {
   return super.clone();
  } catch (CloneNotSupportedException e) {
   return null;
  }
 }
}
Below class is to test shallow copy
public class ShallowTest {

 public static void main(String[] args) {
  // Original Object
  Student stud = new Student("RAJA", "MATHS");
  System.out.println("Original Object : " + stud.getName() + " ---- "
    + stud.getSubj().getName());
  // Create Clone Object
  Student clonedStud = (Student) stud.clone();
  System.out.println("After Cloned Object: " + clonedStud.getName() + " ---- "
    + clonedStud.getSubj().getName());
  //Again setting new data
  stud.setName("Kumar");
  stud.getSubj().setName("CHEMISTRY");
  System.out.println("Original Object after updating: "
    + stud.getName() + " ---- " + stud.getSubj().getName());
  System.out.println("Cloned Object after updating original object: "
      + clonedStud.getName() + " ---- "
      + clonedStud.getSubj().getName());

 }

}
Output

Original Object : RAJA ---- MATHS
After Cloned Object: RAJA ---- MATHS
Original Object after updating : Kumar ---- CHEMISTRY
Cloned Object after updating original object: RAJA - CHEMISTRY

Deep copy with example code

You can use the above shallow example and do a Little bit change like below and execute it. 

public class Student implements Cloneable {

 // Contained object
 private Subject subj;
 private String name;

 
 public Subject getSubj() {
  return subj;
 }

 
 public void setSubj(Subject subj) {
  this.subj = subj;
 }

 
 public String getName() {
  return name;
 }

 
 public void setName(String name) {
  this.name = name;
 }

 public Student(String name, String sub) {
  this.name = name;
  this.subj = new Subject(sub);
 }

 public Object clone() {
  // For deep copy
  Student student = new Student(name, subj.getName());
  return student;
 }

}
The only difference here, we are creating new object inside clone method and returning.

Tuesday, May 3, 2016

How to avoid concurrent modification exception in java with Array List

There are some possible ways to avoid concurrent modification exception in java. we can see some possibility ways with example code.

Example I 

If you will try to remove an elements from an array list like below you will get concurrent exception. 
Code below.
for (String str : yourArrayList) {
        if (condition) {
            yourArrayList.remove(str);
        }
}

Solution for the above code:

You should use Iterator and its remove() method to do this. You should not use directly remove() method of array list.

Iterator<String> it = yourArrayList.iterator();

while (it.hasNext()) {
    String str = it.next();

    if (condition)
        it.remove();
}

Example II

 
Suppose if you are not interested to use iterator here, you can choose another option. Means, you should use another array list , which needs to add all of your removable objects. Code below.
ArrayList toRemoveElements = new ArrayList();
for (String str : yourArrayList) {
    if (condition) {
        toRemoveElements.add(str);
    }
}
yourArrayList.removeAll(toRemoveElements);


Example III

There is a third option you can use CopyOnWriteArrayList. Code below.
List<String> yourList = new CopyOnWriteArrayList<String>();
    yourList.add("A");
    yourList.add("B");

    for( String str : yourList )
    {
      if( condition )
      {
        yourList.remove( new String("B" ) );
      }
    }

Wednesday, April 27, 2016

Spring Bean Life Cycle

Spring Bean Life Cycle

Spring beans are managed by Spring IOC container. Various types of life cycle interfaces will be involved during bean life cycle by this container.

If any bean want to be used by application some initialization process needs to be followed and the same way for destroying some destroying process needs to follow. Spring container following some process and this process we are calling as Bean Life Cycle.

Flow Diagram Overview

Bean
Spring Bean Life Cycle Diagram

Order of Execution:

1. IOC container look for the spring bean definition in the configuration file.
2. Once find container will create instance of the bean by using Java Reflection API.
3. If any properties mentioned, it will be populated and Dependency will be injected.
4. If the bean implements InitializingBean interface then it should implements its method
 void afterPropertiesSet() throws Exception;
5. If the bean implements DisposbleBean interface then it should implements its method
void destroy() throws Exception;

The above process is looks like simple, but mostly its not recommended since it will create tight coupling.
6. If the bean implements any of the following Aware interfaces for the specific behavior, then that process will be started with its methods. See, if you are implements any of the following, then only it will be executed. 

1. ApplicationContextAware
2. ApplicationEventPublisherAware
3. BeanClassLoaderAware
4. BeanFactoryAware
5. BeanNameAware
6. LoadTimeWeaverAware
7. MessageSourceAware
8. NotificationPublisherAware
9. ResourceLoaderAware

Below sample code implementing all of above interfaces and overriding its methods.
public class TestBean implements ApplicationContextAware,
        ApplicationEventPublisherAware, BeanClassLoaderAware, BeanFactoryAware,
        BeanNameAware, LoadTimeWeaverAware, MessageSourceAware,
        NotificationPublisherAware, ResourceLoaderAware
{
    @Override
    public void setResourceLoader(ResourceLoader arg0) {
        // TODO Auto-generated method stub
    }
 
    @Override
    public void setNotificationPublisher(NotificationPublisher arg0) {
        // TODO Auto-generated method stub
 
    }
 
    @Override
    public void setMessageSource(MessageSource arg0) {
        // TODO Auto-generated method stub
    }
 
    @Override
    public void setLoadTimeWeaver(LoadTimeWeaver arg0) {
        // TODO Auto-generated method stub
    }
 
    @Override
    public void setBeanName(String arg0) {
        // TODO Auto-generated method stub
    }
 
    @Override
    public void setBeanFactory(BeanFactory arg0) throws BeansException {
        // TODO Auto-generated method stub
    }
 
    @Override
    public void setBeanClassLoader(ClassLoader arg0) {
        // TODO Auto-generated method stub
    }
 
    @Override
    public void setApplicationEventPublisher(ApplicationEventPublisher arg0) {
        // TODO Auto-generated method stub
    }
 
    @Override
    public void setApplicationContext(ApplicationContext arg0)
            throws BeansException {
        // TODO Auto-generated method stub
    }
}


7. Suppose in your configuration file, bean uses init-method attributes , then that method will be called. Sample configuration code below. 


8. Same way bean configuration uses default-destroy-method attributes , then that method will be called . Above sample configuration code have that.

Below is the simple custom init and destroy method.
public class TestBean 
{
    public void customInitmethod() 
    {
        System.out.println("Custom Init() invoked");
    }
 
    public void customDestroymethod() 
    {
        System.out.println("CustomDestroy() invoked");
    }
}

Thursday, April 21, 2016

Hibernate One to Many Relationship with Example

One to may relationship can occur between two tables and where one table row can have multiple matching rows from other table. In hibernate also same concept with the name of Entity.

How its occurring ?

As usual, by the help of primary key Foreign key relationship.

One To Many (XML Mapping)

We have taken two model classes to describing this relationship. Item class and ItemRecord class.

Item.java 


package com.javahit.items;

import java.util.HashSet;
import java.util.Set;

public class Item implements java.io.Serializable {

 private Integer itemId;
 private String itemCode;
 private String itemName;


 private Set<itemrecord> itemRecords = 
    new HashSet<itemrecord>(0);

 //getter setter
}

ItemRecord.java

package com.javahit.items;

import java.util.Date;

public class ItemRecord implements java.io.Serializable {

 private Integer itemRecordId;
 private Item item;
 private Float price;
 private Long volume;


 //getter & setter
}

Hibernate XML Mapping file

For the above two model classes we should create hibernate mapping files.Lets see , how its look like

item.hbm.xml


inverse = true specifies, which side the relationship(One to Many , Many to Many) should take care. Mostly it will be come with these two relationship only.

lazy specifies, whether to load child objects(tables) or not, while loading parent object.(tables).

fetch = "select" - do a lazy load for all collection and entities. Remaining possible strategies are below.
fetch = "join" - It will disable lazy load , so all collection and entities will be loaded always.
fetch = "batch-size" - You can mention batch size here to fetch collection and entity data.
fectch = "subselect" - It will make your collection group into a subselect.

itemRecord.hbm.xml


Hibernate Configuration xml

Now configure your two model classes hbm xml as well as db driver, userName, pwd etc details.


    com.mysql.jdbc.Driver
    jdbc:mysql://localhost:3310/testdb
    sa
    password
    org.hibernate.dialect.MySQLDialect
    true
    true


Store Data

This is our final java class file which contains hibernate configuration logic and one to many working code.

package com.javahit;

import java.util.Date;
import org.hibernate.Session;
import com.javahit.items.Item;
import com.javahit.items.ItemRecord;


public class StoreAndRetreive {
 public static void main(String[] args) {
 
 Configuration cfg=new Configuration();    
        cfg.configure("hibernate.cfg.xml");  
    
        SessionFactory sf=cfg.buildSessionFactory();    
        Session session=sf.openSession();    
        Transaction tx=session.beginTransaction();

 Item item = new Item();
        item.setItemCode("1001");
        item.setItemName("Item Name");
        session.save(item);
        
        ItemRecord itemRecords = new ItemRecord();
        itemRecords.setPrice(new Float("5.2"));
        itemRecords.setVolume(10L);
        
        itemRecords.setItem(item);        
        item.getItemRecords().add(itemRecords);

        session.save(itemRecords);

 tx.commit();
 System.out.println("Sucess");
 }
}