Saturday, August 6, 2016

React JS - DatePicker

Date Picker

You should install and import the below for date picker.

npm install react-datepicker --save


App.jsx


import React from 'react';
  import DatePicker from 'react-datepicker';
  import moment from 'moment';

  class App extends React.Component {

    constructor(props) {
      super(props);
      this.state = {
        startDate : moment()
      };

      this.handleChange = this.handleChange.bind(this);
      
    }

    handleChange (date) {
      this.setState({
        startDate : date
      });
    }

     render() {
        return (
           <div>
              Hello World!!!
  <br />
  <br />
  <br />
  <br />
  <br />
  <br />

  <br />
          <DatePicker
          selected={this.state.startDate}
          onChange={this.handleChange} />;
           </div>
        );
     }
  }

  export default App;

index.html
 datepicker css added here.

<!DOCTYPE html>
<html lang = "en">

   <head>
      <meta charset = "UTF-8">
      <title>React App</title>
   </head>

<link rel="stylesheet" type="text/css" href="node_modules/react-datepicker/dist/react-datepicker.css"/>

   <body>
      <div id = "app"></div>
      <script src = "index.js"></script>
   </body>

</html>

main.js

Rendered the App from here,

import React from 'react';
import ReactDOM from 'react-dom';
import App from './App.jsx';


ReactDOM.render(<App />, document.getElementById('app'));

Output:


Friday, July 22, 2016

Pass parameters from one JSP to another JSP

To do this, you need to add jsp:include and its jsp:param properties .

First.jsp
<%@ page language="java" contentType="text/html;charset=UTF-8" %>
<html>
<head>
    <title>Pass Parameters from one JSP to another JSP Page</title>
</head>

<body>
      This is your First JSP page.

    <jsp:include page="Second.jsp">
        <jsp:param name="param1" value="Firstvalue"/>
        <jsp:param name="param2" value="Secondvalue"/>
    </jsp:include>
</body>
</html>

Second.jsp
<%@ page language="java" contentType="text/html;charset=UTF-8" %>
<html>
<head>
    <title>Pass Parameters Example</title>
</head>

<body>
    This is your second JSP page.
    param1: <%= request.getParameter("param1") %>
    param2: <%= request.getParameter("param2") %>
</body>
</html>

Explanation :

1.You have to include Sceond.jsp in the First.jsp page.

2. Use jsp:include property, jsp:param to pass parameter to the Second.jsp which was already included with the help of jsp:include.

3.Retrieve the passed values from First.jsp through getParameter method.

SubQuery for Beginners

Sub query  - Embedding a SQL statement within another SQL statement. It can be used with sql comparison operators like =,<.>,<=,>= etc.,

Additionally, we can write with LIKE IN, NOT IN, ANY and IN operators. Now you may have question when we have to use LIKE IN etc., and comparison operators while writing query.

Things to remember:

1. Sub query may return one row or more than one row.
2. If it will return more than one row then you should use IN operator.
3.It must be enclosed with parenthesis.
4. You can not use ORDER BY in sub query. Instead of that, you can use GROUP BY.


Sub Query Format:

SELECT "column_name1"
FROM "table_name1"
WHERE "column_name2" [Comparison Operator] or [LIKE IN, ANY etc.,]
(SELECT "column_name3"
FROM "table_name2"
WHERE "condition");

Highlighted in blue color is inner query and highlighted in red color is called outer query. Let see the example one by one, so that we able to understand more clearly.

Example I: Sub Query with IN operator

ID     NAME  AGE PLACE     SALARY  

  1     Rajesh     35    Chennai       2000.00
  2     Velava     25    Mumbai       1500.00
  3     kajol        23    Hyderabad   2000.00
  4     Mukesh   24    Madurai       10000.00

Sub Query:

SELECT * 
FROM CUSTOMERS 
WHERE ID IN (SELECT ID 
             FROM CUSTOMERS 
             WHERE SALARY > 1800) ;

Output:

 ID   NAME      AGE  PLACE      SALARY  

  1     Rajesh        35     Chennai          2000.00 
  3     kajol           23     Hyderabad      2000.00 
  4     Mukesh      24     Madurai        10000.00 


Note: Above query uses IN operator, due to inner query will return more than one rows.

Sub Query with Comparison Operator


        student                                     marks
Student Id         Name                                 Student Id                 Marks      
     1                Kalpana                                       1                               91
     2                Peter                                             2                               89
     3                Rajini                                           3                               97
     4                Ajith                                             4                               96 
     5                Vijay                                             5                               95

Ok, Now the question is , How to identify all students who get high marks than one of the student who`s id is 5. Here, you don't know marks of student id 95.

So we can split this question as two,
 1. What s the mark of student Id 95 ? (95Marks)
 2. Who are all getting high marks than studetn Id 95 marks? (>95 Marks)

For 1st question, query is below,

Select * from marks
where student_id = '5'

Output:

Student Id     Marks
       5                  95

Now second question, query is below,

Select a1.student_id,a1.name,m1.marks 
from student s1, marks m1
where s1.student_id = m1.student_id
AND m1.marks > 95

Output:

studentId     name       marks
3                   Rajini         97
4                   Ajith           96

Now combine these two query, 

SELECT a.studentid, a.name, b.marks  
FROM student a, marks b  
WHERE a.studentid = b.studentid AND b.marks >  
(SELECT marks  
FROM marks  

WHERE studentid =  '95');  

Output:

studentId     name       marks
3                   Rajini         97
4                   Ajith           96

Thursday, July 21, 2016

JAVA Generics

Java Generics is similar to C++ Templates. You can write a code with Generics for methods, classes and interfaces. Let see one by one. 

Generics Class
To create Generics class we have to use < >. The most commonly used type parameter names are:

E - Element (used extensively by the Java Collections Framework)
K - Key
N - Number
T - Type
V - Value
S,U,V etc. - 2nd, 3rd, 4th types

To know more please visit here. Ok,

Example code:

// Use < > to specify Parameter type
class JavaHit<T>
{
 // An object of type T is declared
 T obj;
 JavaHit(T obj) { this.obj = obj; } // constructor part
 public T getObject() { return this.obj; }
}

//To test above I used this class
class Main
{
 public static void main (String[] args)
 {
  // For Integer type
  JavaHit <Integer> integerObj = new JavaHit<Integer>(37);
  System.out.println(integerObj.getObject());

  // For String type
  JavaHit <String> stringObj = new JavaHit<String>("TestForString");
  System.out.println(stringObj.getObject());
 }
}

Output:
37
TestForString

From the above code , you able to understand you can pass any wrapper like Integer , Float etc.,

Multiple Type Parameters

// Use < > to specify Parameter type
class JavaHit<T, U>
{
 T obj1; // An object of type T
 U obj2; // An object of type U

 // constructor
 JavaHit(T obj1, U obj2)
 {
  this.obj1 = obj1;
  this.obj2 = obj2;
 }

 // To print objects of T and U
 public void print()
 {
  System.out.println(obj1);
  System.out.println(obj2);
 }
}

// To test above I used this class
class Main
{
 public static void main (String[] args)
 {
  JavaHit <String, Integer> obj =
   new JavaHit<String, Integer>("TestForString", 37);

  obj.print();
 }
}

Output
TestForString
37

Generics Functions:
In nutshell, you can pass here, different types of arguments. Let see code below.

// Generic functions

class Test
{
 
 static <T> void genericParameterDisplay (T typeofelement)
 {
  System.out.println(typeofelement.getClass().getName() +
      " = " + typeofelement);
 }
 
 public static void main(String[] args)
 {
  // Calling generic method for Integer
  genericParameterDisplay(37);

  // Calling generic method for String
  genericParameterDisplay("TestForString");

  // Calling generic method for double
  genericParameterDisplay(10.02);
 }
}

Output:
37
TestForString
10.02

Generics Advantages :

1. Code Reuse.
2. Type safety
3. No need Type casting

Wednesday, July 20, 2016

Ajax - Tutorial Part I - Your First program

Ajax -Introduction

Ajax (Asynchronous JavaScript and XML )is not a programming language, Its a script. It will update parts (div) of the web page, without reloading the whole page. For example, selecting drop down values.

So it will make web page as Fast and Dynamic and It supports asynchronous operation.

Synchronous: We can send single request at a time and need to wait to get the response before sending second request.

Asynchronous: It will support to send second request before receiving the response of first request. Ajax will support asynchronous. So that its good for web applications.

You must know, JavaScript, CSS and little bit knowledge of xml to work with Ajax.


How to create XMLHttpRequest Object ?

Almost all modern browsers have built-in with XmlHttpRequest object. But older version like IE5 and IE6 will not support this. So in this case you should use ActiveX object.

Let see the syntax ,


variable = new XMLHttpRequest(); // Latest Browsers


variable = new ActiveXObject("Microsoft.XMLHTTP"); // Old Browsers

Methods of XmlHttpRequest

Method Description
abort Abort was introduced in Internet Explorer 7. The abort method interrupts an asynchronous operation in progress.

getAllResponseHeaders Returns all the response headers, separated by CRLF, as a string, or null if no response has been received.

getResponseHeader Returns the string containing the text of the specified header, or null if either the response has not yet been received or the header doesn't exist in the response.

open Initializes a request. This method is to be used from JavaScript code; to initialize a request from native code, use openRequest() instead.

overrideMimeType Overrides the MIME type returned by the server.

send Sends the request. If the request is asynchronous (which is the default), this method returns as soon as the request is sent..

setRequestHeader Sets the value of an HTTP request header. You must call setRequestHeader()after open(), but before send().


Apart from these, some non standra method also there. Please refer Here .


Properties of XMLHTTPrequests


Below are the properties of XmlHttpRequest.

1. onreadystatechange - This property sets the method to be called on every state change. This is usually your event handler for the asynchronous callback.

2. ReadyState - It will defines the state of the XmlHttpRequest.Possible values include:


        0 Uninitiated
        1 Loading
        2 Loaded
        3 Interactive
        4 Complete

When sending XmlHttpRequest, check to see if the readyState is 0 or 4, and while asynchronous callback handler, will check to see if readyState is 4.

3. responseText - Returns a DOMString that contains the response to the request as text, or null if the request was unsuccessful or has not yet been sent.

4. responseXML - Returns a Document containing the response to the request, or null if the request was unsuccessful, has not yet been sent, or cannot be parsed as XML or HTML.

5. Status - Returns an unsigned short with the status of the response of the request.

6. statusText - Returns a DOMString containing the response string returned by the HTTP server. Unlike XMLHTTPRequest.status, this includes the entire text of the response message ("200 OK", for example).

Apart from these, lot of properties available , Please refer Here.

Ajax simple program

Below are simple ajax program, let see the code and explanation. Just create one html file and text file and keep the same in under same directory.

<html>
<head>
<script type="text/javascript">
function ajaxFirst()
{
var a;
 
    if (window.XMLHttpRequest)
    {// If the browser if IE7 or Firefox or Chrome or Opera or Safari (Modern Browsers)
      a=new XMLHttpRequest();
    }
   else
    {//If browser is IE6, IE5 (Old Browsers)
      a=new ActiveXObject("Microsoft.XMLHTTP");
    }
 
a.onreadystatechange=function()
{
  if (a.readyState==4 && a.status==200)
  {
    document.getElementById("myDiv").innerHTML=a.responseText;
   }
}
 
a.open("POST","sample.txt",true);
a.send();
} // ajaxFirst() close
</script>
</head>
<body>
 
<div id="myDiv" style="width: 300px; height: 30px;">Please click on below button</div>
<button type="button" onclick="ajaxFirst()">Change Content Here</button>
 
</body>
</html>
Code Explanation :

1. When the button is clicked , onClick event will call ajaxFirst() javascript method.
2. If your browser is modern like latest, then it will create XmlHttpRequest, else ActiveXObject will be created.
3. Next it will open a connection and send the request your sample text file. True parameter mentioned here, you are enabling Asynchronous operation.
4. Then send method will send the request.
5. After receiving response from server, it will execute onreadystatechange automatically.
6. Readystate 4 mentioning , it is completed and 200 status code mentioning response is success.

Tuesday, July 19, 2016

How to create Immutable class in java?

Most of the interview, we can expect this question. In Nutshell, java have lot of immutable classes like String, Integer, Float etc.,

Please remember below points to make your class as immutable.
  • Make your class as Final, So that other can not extends it, means cannot create sub class. 
  • Declare instance variable as Final with private modifier, so that it can not change once initiated.
  • Don't implement setter methods.
  • Finally, don't provide any method which will change the behavior of state of the object.

Example :

public final class JavaHit{ 
    final String name;  
  
public JavaHit(String name){  
    this.name=name;  
  }  
  
public String getName(){  
    return name;  
  }    


Benefits of Immutable class:
  • It will be helpful in synchronization environments, since its thread-safe.
  • Internal state of immutable class will be fine, even you get any exception.
  • It will be good to work with Map Keys and set elements, since typically it will not change once its created.

Friday, June 17, 2016

Things to remember about Null Pointer Exception

Our day to day coding life, we are facing Null pointer exception in most cases. We can see some good points about this. 

1. The instanceof operator

Code: 
String str = null;
if(str instanceof String)
   System.out.println("String is an instance here");
else
   System.out.println("String is not an instance here");

Output:
String is not an instance here

You can use instanceof operator , even if the object reference equals to null. It will not throw null pointer exception.


2. Null with contains , containsKey and containsValue methods

Code: 
 
String value = map.get(key);
System.out.println(value.toString());  

We know map, which is working based on key and value concept. From the above code, suppose if value is null, then it will throw null pointer exception here.

To avoid Null pointer for above code : 
if(map.containsKey(key)) {
    String value = map.get(key);
    System.out.println(value.toString()); // Now No exception
}


3. Apache StringUtils class
 
if (StringUtils.isNotEmpty(str)) {
     System.out.println(str.toString());
}

We can use StringUtils.IsEmpty and StringUtils.equals also.


4. String comparison with equals 

This is very useful, in most of our programs.

String str = null;
 if(str.equals("Test")) { // Exception will throw here
    }

  To avoid above Code Error

String str = null;
    if("Test".equals(str)) { //No Exception now
    }


5. Ternary operator

String message = (str == null) ? "" : str.length();

From the above, if str is null, then assign empty for that, else calculate length.


6. valueOf() is better than toString()

    String str = null;
    System.out.println(String.valueOf(str));  // it will prints null        
    System.out.println(str.toString()); // it will throw NullPointer Exception


7. Working with Static method or Static members

Below code will not throw any error.

class Test {     
         public static void testMessage() {
              System.out.println("Test Message");
         }
    }

    public class TestStatic {
         public static void main(String[] args) {
              Test t = null;
              t.testMessage();
         }
    }

However, as per rule, static method should be called through class name only. Calling static method by object reference is not advisable.

Friday, June 10, 2016

extends Thread vs Implements Runnable

There are two ways to create a thread in Java.

1. By extending Thread class

2. By implementing Runnable Interface

Lets see the difference now.
  • If you are extending Thread class , you can not extends another class again, since Java does not support multiple inheritance.
  • If you are using implements Runnable interface , then there is a chance to extending another class.
  • Very important difference is, your thread will create unique object and make an associates with it while extends Thread.
  • But if you are using an implements Runnable Interface, It will share same object to multiple threads. 

Now we can understand this with one example, which will clarify more.

class ImplementsRunnable implements Runnable {
 
 private int count = 0;
 
 public void run() {
 count++;
 System.out.println("ImplementsRunnable checking Test : " + count);
 }
 }
 
 class ExtendsThread extends Thread {
 
 private int count = 0;
 
 public void run() {
 count++;
 System.out.println("ExtendsThread checking Test : " + count);
 }
 }
 
 public class ThreadVsRunnable {
 
 public static void main(String args[]) throws Exception {


 ImplementsRunnable rc = new ImplementsRunnable();
 Thread t1 = new Thread(rc);
 t1.start();

 Thread.sleep(1000); 
 Thread t2 = new Thread(rc);
 t2.start();

 Thread.sleep(1000); 
 Thread t3 = new Thread(rc);
 t3.start();
 

 ExtendsThread tc1 = new ExtendsThread();
 tc1.start();
 Thread.sleep(1000);
 
 ExtendsThread tc2 = new ExtendsThread();
 tc2.start();
 Thread.sleep(1000); 

 ExtendsThread tc3 = new ExtendsThread();
 tc3.start();
 }
 }

Output :

ImplementsRunnable checking Test : 1
ImplementsRunnable checking Test : 2
ImplementsRunnable checking Test : 3
ExtendsThread checking Test : 1

If you will analyze the output, it says well like Runnable interface sharing one instance and increment values. But it is opposite in Thread class, since it creates separate instance every time.

Monday, June 6, 2016

Difference between sleep and wait in java ?

Sleep and wait () method

sleep () is a method , which is used to hold the process for a particular time or How much time you wanted to hold. 

wait () method goes to waiting stage and it wont come back to normal until notify() or notifyAll() method should be called. 

Important points about sleep() method

1. Sleep is a static method on Thread class. 

2. It will makes your current thread into Not Runnable state for the specified amount of time.      
    Thread keeps the lock, during this time. 

3. It will be waked by interrupt or time expires.

4. It throws interrupted exception if another thread interrupts a sleeping thread.


Important points about wait() method

1. wait is an object class method.

2. It will makes your current thread into Not Runnable state. 

3. Remember, wait is called on an object not on thread. 

4. wait() should be used inside synchronized block or synchronized method. 

5. It will release the lock and gives the chance to others. 

6. It will be awake by calling on notify() or notifyAll() methods.

Friday, June 3, 2016

How LEFT JOIN and RIGHT JOIN works

As usual, we are keeping the same two table Employee and location to explain left and right joins.

Employee Table

empIdEmpName
101Rajesh
102Vinodh
103Kumar
104Mukesh

Location Table

empIdLocation
101Chennai
102Mumbai
103Kolkatta
105Hyderabad

What is LEFT Join ?

The LEFT JOIN keyword returns all rows from the left table (What is left table ? ), with whatever matching rows in the right table (What is right table ?).

Suppose if there is no match in the right side, result is NULL.

We can write query first for this left join, after that I will explain. Left join query will be,

select * from employee left join location 
on employee.empID = location.empID;

Output : 

Employee.empIDEmployee.empNameLocation.empIDLocation.empLocation
101Rajesh101Chennai
102Vinodh102Mumbai
103Kumar103Kolkatta
104MukeshNullNull

From the result, we able to understand , left join query taking the rows from left table completely. If there is no match in the right tale it will return null like above.

Ven Diagram 
Left
Left Join Ven diagram


What is Right Join ?

The RIGHT JOIN returns all rows from the right table with the matching rows in the left table. If there is no match in the left table it will return NULL. 

Ven diagram of Right Join
right join
Right Join Ven diagram


Right Join Query

select * from employee right join location
on employee.empID = location.empID
 
Below figure represents some clear idea about left and right join.  

pointing
Table pointing identification of right and left join


Wednesday, June 1, 2016

Understanding Self Join Briefly with Example

Self join is easiest to understand. We can see how its working with one good example clearly. Consider the below table we have called Employee which have two columns name and location.

Employee Table

NameLocation
MillarChennai
RajeshDelhi
StalinChennai
KumarMumbai

Now you have to write the query for the below question.

1. How you find out which employees are coming from same location as name have Millar.

After seeing the question you will write the query immediately like below.
select name
from Employee
Where location in (select location from employee where name = "Millar"
 
Fine. It will work perfectly. But using sub query is not a good practice. So in this place SELF JOIN can play its role perfectly. 

What is SELF JOIN ? 

             Self join is nothing but, when a table is joined itself called self join. So it will take two copies to join the table itself. To work with self join we must use aliases which will allow you to write a query with good efficient way. The reason here, why we are using aliases means, we should differentiate two copies of that table. Right ?  Yes. 

Any join(left, right, outer etc.,) will work with condition only. So self join also having condition to perform self join operation. Now throw the sub query from your mind and bring your mind into Self Join. Already we have discussed , two copies of table it have. Just call those copies as e1, e2.


 Table  -    e1
NameLocation
MillarChennai
RajeshDelhi
StalinChennai
KumarMumbai


 Table  -    e2
NameLocation
MillarChennai
RajeshDelhi
StalinChennai
KumarMumbai

As we discussed earlier, two tables was created like e1 and e2. After writing query Self join query is like below. 

SELECT e1.Name
FROM employee e1, employee e2
WHERE e1.location = e2.location
AND e2.Name="Millar";

Lets analyze the query , the condition WHERE e1.location = e2.location will give results (Rows) of location. Again we must add another condition which should be e2.Name="Millar". Based on the name we should filter , so that we added this condition. But you may get one doubt here, why we want to add only e2.Name ?.   Since, we need to return only the rows name as Millar. If you will add condition for both side of e1 and e2, it will return both side of table rows.

So you will find below finally,

e1.Namee1.Locatione2.Namee2.Location
MillarChennaiMillarChennai
StalinChennaiStalinChennai

Monday, May 30, 2016

JSP Interview Questions and Answers

1. Can you tell me JSP life cycle methods and JSP life cycle phases ?

JSP Life Cycle methods
 
Jspinit()      - It will be invoked when the JSP page is initialized.

_jspService()  - It corresponds to the body of the jsp page and it will be handle for requests  
                 and response for all seven HTTP methods ie. GET, POST, DELETE etc.

jspDestroy()   - CleanUp activity will be handled by this method.

Refer for flow diagram

JSP Life Cycle Phases

1. Translation phase
2. Compilation phase
3  Instantiation phase
4  Initialization phase
5  Servicing phase
6  Destruction phase

2. What are the Directives in Jsp?

jsp engine will use this as a translation time instruction.

1. Page directive
2. Include directive
3. Taglib directive

3. What are the Jsp Implicit Objects?

Implicit objects will be created by container and developer no need to create it explicitly. Totally 9 implicit objects are available in jsp.

    1. out
    2. request
    3. response
    4. config
    5. application
    6. session
    7. pagecontext
    8. page
    9. exception

4. Difference between include directive and include action?

include directive -
<%@ include>

1. It will be processed at translation time.

2. It wil be static
<%@ include file="header.html" %>

3. You can not pass parameters.


include action (jsp:include )

1. It will be processed at run time.

2. It will be dynamic.

             <jsp:include page="header.jsp" />

              header.jsp will be addded at request time.

3. We can pass parameters by using below.

             <jsp:include page="header.jsp">
                   <jsp param name="menu" value="obj1"/>
             </jsp:include>

5.  Is there anyway to disable session in JSP ? 

Yes,  by using page directive

<%@ page session="false" %>

6.  How to handle exception in JSP and explain?

Two ways we can handle exception in JSP

1. By using isErrorPage and errorPage of page directive attributes.
2. By using <error-page> tag in Deployment Descriptor. (web.xml)


1.1 isErrorPage

<%@ page isErrorPage="true" %>
<html>
<body>
<b> Sorry! This requested page not availbale </b>
<img src="ErrorImage.jpg"/>
</body>
</html>

The above file (Error.jsp) will be executed if any error occurred. Error will be identified by using page directive attribute of isErrorPage. Remember it will be developed only to display error.

1.2 errorPage

It will tells to the Web Container that if any exception occurred at particular page, then forward the request to an error page. So both are totally different logic, but for error purpose only. 

<%@ page errorPage="error.jsp">

<html>
<body>

<!-- Your logical code and any exception occurred while executing this -->

</body>
</html>

 2. <error-page> tag in Deployment Descriptor

It will give some good option to handle error. You should define this web.xml

For all type of Exception

<error-page>
<exception-type>java.lang.Throwable</exception-type>
<location>/error.jsp</location>
</error-page>

For particular exception
<error-page>
<exception-type>java.lang.ArithmeticException</exception-type>
<location>/error.jsp</location>
</error-page>

For HTTP Status code
<error-page>
<error-code>404</error-code>
<location>/error.jsp</location>
</error-page>

<error-page>
<error-code>404</error-code>
<location>/error.jsp</location>
</error-page>

7. What are the action tags in JSP ?

Action Tag Tag Description
jsp:forwardforward the request to a new page
jsp:getProperty    retrieve a property from a JavaBean instance.

jsp:include
include the runtime response of a JSP page.
jsp:plugin
Generates client browser-specific construct that makes an OBJECT or EMBED tag for the Java Applets
jsp:useBean
instantiates a JavaBean
jsp:param
Adds parameters to the request
jsp:elementDefines XML elements dynamically
jsp:textUse to write template text in JSP pages and documents.
jsp:setProperty
store data in JavaBeans instance.
jsp:fallbackSupplies alternate text if java applet is unavailable on the client
jsp:bodyUsed within standard or custom tags to supply the tag body.
jsp:attributedefines dynamically defined XML element's attribute

8.Differentiate between response.sendRedirect(url) and <jsp:forward page > ?

jsp:forward - It will forward one request object to another , which is to be HTML, servlet or JSP.  But important point here is, it should be within application context. (Application).

sendRedirect (url) - It will transer one request to another resource , which is to be different domain or different server.

9.  How you can implement thread safe in jsp ?

To make JSP as thread-safe, you can implement the SingleThreadModel interface , which prevents two threads from accessing the service method at the same time.

The JSP page by default is not thread safe, if you want to make it thread safe then you should add following directive in your JSP page declaration:

<%@ page isThreadSafe="false" %>

10. Is JSP technology extensible?

Yes, JSP is easily extensible witht the help of modification of tags, custom actions etc.,

11.  How will you pass information from one JSP to another JSP?

<Jsp:param> allows us to pass information between multiple Jsp’s.

12. Why does _jspService() start with an ‘_’ but other lifecycle methods does not start ?

The reason is, we should not override _jspservice method, since it will be executed by container. But remaining two methods we can override. 


So '_'  representing here, we should should not override. If you override compiler will give an error.

13.  How to avoid session created automatically in JSP?

 <%@ page session=”false”  %>

14.  What are the various scope values for <jsp:useBean> ?

1)application

2)request

3)page

4)session


15. How to disable java code or scripting in JSP page?

We should add below code in deployment descriptor(web.xml)
   

<jsp-config>
    <jsp-property-group>
        <url-pattern>*.jsp</url-pattern
        <scripting-invalid>true</scripting-invalid>
    </jsp-property-group>
</jsp-config>
 
Here, it will disable all jsp page , but you want to allow to any special jsp then you should add that JSP file name manually.

Friday, May 27, 2016

Jsp Life Cycle and phases flow diagram

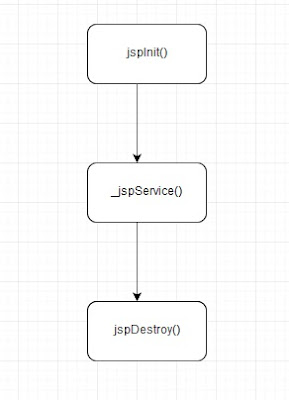
JSP Life Cycle Methods

1. jspInit()
2. _jspService()
3. jspDestroy()

life cycle
Jsp life cycle methods


    Jspinit()          - It will be invoked when the JSP page is initialized.

    _jspService()  - It corresponds to the body of the jsp page and it will be handle for requests   
                              and response for all seven HTTP methods ie. GET, POST, DELETE etc.

   jspDestroy() -   CleanUp activity will be handled by this method.

JSP Life Cycle Phases

1. Translation phase
2. Compilation phase
3  Instantiation phase
4  Initialization phase
5  Servicing phase
6  Destruction phase


Thursday, May 19, 2016

Spring MVC Tutorial part IV - How to use RequestParam annotation

@RequestParam

It will be used in query string to bind the parameter with controller method parameters. We can see some possibility way of using request param.

1. Simple Request Param

@RequestMapping(value = "/order/details", method = RequestMethod.GET)
  public String orderDetails(@RequestParam("orderDevice") String device,
                             Model model) {
    return "orderDetails";
  }

In the above method, the URI will be formed like /order/details?orderDevice=Laptop and where Laptop is value of orderDevice argument.

2. Request Param with Required attribute

@RequestMapping(value = "/order/details", method = RequestMethod.GET)
  public String orderDetails(@RequestParam("orderDevice", required=false)
                             String device, Model model) {
    return "orderDetails";
  }  

If the value is missing for the orderDevice parameter, which value will be set to null,  else value will be passed as usual.

Note:
Required attribute default value is True. If the parameter is missing status code 400 will be returned.

3. Request Param with Default value

@RequestMapping(value = "/order/details", method = RequestMethod.GET)
  public String orderDetails(@RequestParam("orderDevice",
                       defaultValue="MobileDevice") String device, Model model) {
    return "orderDetails";
  }

If the value is missing for the orderDevice parameter, which value will be set to MobileDevice as a default value.

4. Request Param with multiple param values

@RequestMapping(value = "/order/details", method = RequestMethod.GET)
  public String orderDetails(@RequestParam("orderDevice") String device, 
                       @RequestParam("deviceId") String deviceId, Model model) {

   model.addAttribute("msg", "Order device and its Id : "+
                                                 device+", "+deviceId);
   return "orderDetails";
  }

Above will be mapped to /order/details?orderDevice=Laptop&deviceId=123

5. Request Param with Map object

@RequestMapping(value = "/order/details", method = RequestMethod.GET)
  public String orderDetails(@RequestParam Map<String, String> queryMap,
                             Model model) {

   String device = queryMap.get("orderDevice");
   int deviceId = queryMap.get("deviceId");

   model.addAttribute("msg", "Order device and its Id : "+
                                                 device+", "+deviceId);
   return "orderDetails";
  }

From the above, both orderDevice and deviceId mapped to Map object with the help of requestParam annotation. So you access with Map object like above code.

URI will be like /order/details?orderDevice=Laptop&deviceId=123

6. Request Param with possibility ambiguous

@Controller
@RequestMapping("/Electronics")
public class ElectronicsController {

@RequestMapping(value = "/order/details", method = RequestMethod.GET)
  public String orderDetails(@RequestParam("orderDevice") String device, 
                              Model model) {

   return "orderDetails";

  }


@RequestMapping(value = "/order/details", method = RequestMethod.GET)
  public String orderDetails(@RequestParam("deviceId") String deviceId, 
                              Model model) {

   return "orderDetails";

  }
}

Above method make Run time exception, since complain about ambiguous mapping. Exception is look like Caused by: java.lang.IllegalStateException: Ambiguous mapping.