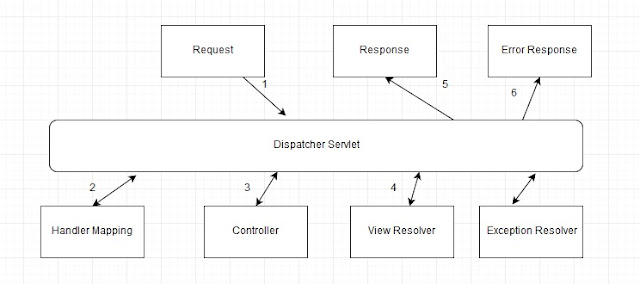
MVC Architecture
The Spring MVC frameworks provides a good concept Model View Controller architecture. Lets see the definition of MVC. Generally you may find different definitions for MVC.Its an web application development framework.
Model - Its the application data, and its just not only the data. It may have any logic which is produce data for your application.
View - It will rendering model data and generates the HTML output to the client browser.
Controller - Its the responsibility to process your requests with the help of model and passes to view for rendering.
Dispatcher servlet is an servlet and Its inherited from HTTPServlet base class. We should declare and mapping all request which should be handled by Dispatcher servlet. Below is the web.xml code for Dispatcher Servlet.
The Dispatcher Servlet
It will handle all the HTTP request and responses and It is integrated with spring IOC container so that it is using all the features of spring.Dispatcher servlet is an servlet and Its inherited from HTTPServlet base class. We should declare and mapping all request which should be handled by Dispatcher servlet. Below is the web.xml code for Dispatcher Servlet.
<web-app>

    <servlet>
        <servlet-name>exampleTest</servlet-name>
        <servlet-class>org.springframework.web.servlet.DispatcherServlet</servlet-class>
        <load-on-startup>1</load-on-startup>
    </servlet>

    <servlet-mapping>
        <servlet-name>exampleTest</servlet-name>
        <url-pattern>/example/*</url-pattern>
    </servlet-mapping>

</web-app>
So in the above code, all request will come with /example will be handled by Dispatcher Servlet. Suppose if your application have both struts and spring framework means, you need to configure ActionServlet also in web.xml. Ok, fine. Now Dispatcher Servlet initialization job is done. Now spring MVC looks for a file name called [servlet-name]-servlet.xml in the WEB-INF directory of your web application.
In the above configuration code we have used example as a servlet name , so your [servlet-name]-servlet.xml file will be example-servlet.xml. You can put anything as servlet name which should be used with -servlet.xml.
Suppose if you like to use customize [servlet-name]-servlet.xml, then you need to configure ContextLoadListener like below.
<web-app>

<!---DispatcherServlet definition goes here --->

<context-param>
   <param-name>contextConfigLocation</param-name><param-value>/WEB-INF/Hello-servlet.xml</param-value></context-param>

<listener>
   <listener-class>
      org.springframework.web.context.ContextLoaderListener
   </listener-class>
</listener>
</web-app>
[servlet-name]-servlet.xml (example-servlet.xml)
Code configuration is below for example-servlet.xml. It should be placed inside WEB-INF directory.
For example,
prefix + viewname (return from ModelAndView object) + suffix = URL of view page
We can see later what is ModelAndView object. In shorten, ModelAndView will return one name like hello.
Then page will be prefix+hello+suffix menas, /WEB-INF/jsp/hello.jsp. Hope you got it.
Its advisable and good practice to use JSP under WEB-INF for security purpose. Means, through direct URL (Manual URL) it wont give access.
Sample I - @RequestMapping with class
Sample code below
<context:component-scan base-package="com.javaHit"/>;
       <bean class="org.springframework.web.servlet.view.InternalResourceViewResolver">
          <property name="prefix" value="/WEB-INF/jsp/" />
          <property name="suffix" value=".jsp" />
       </bean>
Here, InternalResourceViewResolver will be used to access any views page like JSP, HTML, XHTML etc., It extends UrlBasedViewResolver that has two property i.e prefix and suffix. So the URL of view page will be make with the help of this prefix and suffix.
For example,
prefix + viewname (return from ModelAndView object) + suffix = URL of view page
We can see later what is ModelAndView object. In shorten, ModelAndView will return one name like hello.
Then page will be prefix+hello+suffix menas, /WEB-INF/jsp/hello.jsp. Hope you got it.
Its advisable and good practice to use JSP under WEB-INF for security purpose. Means, through direct URL (Manual URL) it wont give access.
Controller
When request come, Dispatcher Servlet delegates the request to particular controller to executes the logic or functionality. To define controller class we need to use @Controller annotation. Next we need to use @RequestMapping annotation to map an URL for an entire class or particular method. I would like to add two sample code below to understand more on Request Mapping.Sample I - @RequestMapping with class
Sample code below
@Controller
@RequestMapping("/hello")
public class HelloController{

}
/hello will be used as URI for this controller class. Here we used , GET method (RequestMethod.GET) to handle the HTTP request.
@RequestMapping(value="/methodHello")
@ResponseBody
public String methodHello(){
    return "hello";
}
Here, value attributes provides the URI for which method should be executed. @ResponseBody will return response as String. We can do more with this @RequestMapping like how to produce response how to consume input etc.,We can see these all later as a separate post.
Now You can understand more with the help of below diagram.
 |
| Spring MVC Architecture |
No comments:
Post a Comment